Wednesday, November 27, 2013

An ideal APS kit: Nikon DX camera and two fast Sigma zooms

Digital camera sensors have shown amazing advancements in just the past few years to a point where APS and even smaller sized sensors are more than adequate to produce professionally usable images. One thing that has not kept pace with this advance is the availability of APS lenses that are similar in terms of quality, and fast aperture speed, to what we find for full frame models.  Specifically, I am talking about the short to medium zoom in the 24-70mm f/2.8 range along with a long tele zoom similar to a 70-200mm f/2.8. These two lenses are the mainstay zooms of most pros. The focal lengths have been available for APS cameras, but not coupled with fixed, fast apertures. I never could figure out why the top camera makers were not producing something like a 50-150mm f/2.8, which would be roughly equivalent to a full frame 70-200mm.

Finally a lens manufacturer has decided to fill the gap. Sigma has come along and addressed this issue with two fast, fixed aperture zooms in a variety of camera mounts, including Nikon DX. If they are as good as they appear to be, they may for the basis for a top notch profession camera kit in DX format.

The Sigma 18-35mm f/1.8 zoom lens mounted on a Nikon D7100 with the Sigma 50-150mm f/2.8 zoom and Nikon D5300 nearby.
The shorter zoom is an 18-35mm (28-50 full frame equivalent), which is a bit smaller than the typical 24-70mm zoom range that has become the medium range staple of full frame cameras. However, the Sigma lens has an unusually fast and fixed f/1.8 aperture making it exceptionally handy for the range it does cover.

Sigma's other APS zoom is a 50-150mm f/2.8 which is equivalent to 75-225mm in full frame, pretty much the perfect size and aperture for a standard long zoom.

Both lenses are part of Sigma's new Art series intended for high end use by being better made with quality optics. While both lenses are a bit on the heavy side for what is normally associated with an APS sensor camera, they are heavier due to their large apertures, which is the whole point of these lenses, and they are still considerably lighter than their full frame equivalents. These lenses are intended to fill a gap in the APS camera range by supplying more professionally suitable optics to photographers who want to use this smaller camera format.

Photographed with a Nikon D7100 and Sigma 50-150mm f/2.8 zoom lens. 
To my way of thinking, these two zooms could form the base outfit for a professional APS camera system. Couple them with a Nikon D7100 or even the D5300, add a macro like the 40mm, and one of the Nikon wide angle zooms, and you're ready to go -- a lighter and smaller than normal system capable of top level results.

The Sigma 18-35mm seems to be able to come in closer that other lenses I have used in this zoom category.
I will be testing and reporting on each of these lenses separately over the next week. In addition, I will be testing the new Nikon D5300, and posting my reviews on this blog.

I have already had some time to play with these lenses on the two Nikon cameras I mentioned and have been favorably impressed thus far. I suspect that if anyone is looking for a really top notch, pro outfit in the DX format, these two lenses may be the cornerstone to achieving it.

Tuesday, November 26, 2013

Photographic composition, part I - Working with a grid

The rules of composition are not necessarily hard and fast. They serve as guides only, much like lined paper does for writing straight sentences. Photography is a graphic medium. Much like painting, an image is typically created on a two-dimensional surface bordered on four sides. This working surface is the tabula rasa. The instant a mark is placed on the flat surface a composition begins by relating the mark and its position to the four sides of the picture frame. As more marks are added to the surface, they begin to relate to one another as well as to the four sides of the frame. Control over the placement of elements and their relationships within the framed border can convey specific meanings to the viewer, much like the structure and inflection of language.

This blog discussion only addresses one aspect of composition, namely graphic composition. There are many other elements to composition -- color, and shape to name a couple. I will come back to these in a later blog posts.


Graphic composition, like music, is recognized as pleasing and meaningful to the human mind by the harmony -- or dis-harmony -- of its elements. Over thousands of years we have contrived conventions for dealing with the division of graphic space. The most basic of these is the grid, and the most basic grid is a single rectangular space bordered on four sides. We expand the grid by sub-dividing the space into evenly separated elements.

One of the oldest rules of graphic composition is the rule of thirds. It is when a rectangular space is evenly divided by two horizontal and two vertical lines, and is derived from the popular format of 35mm film, which is 24x36mm, or 2:3.

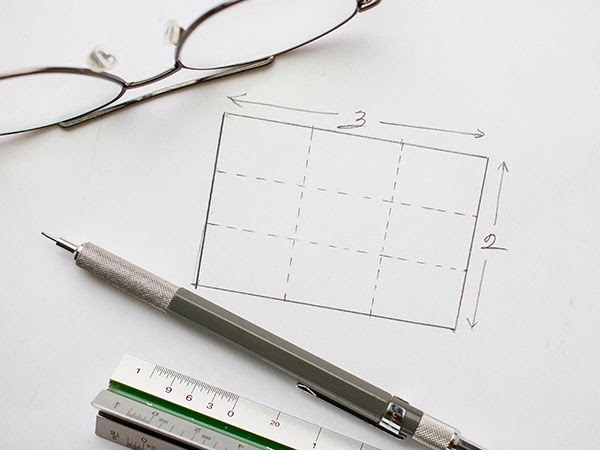
The 35mm frame has a 2:3 proportion. The illustration above shows it divided evenly into a grid of three parts horizontally and vertically.

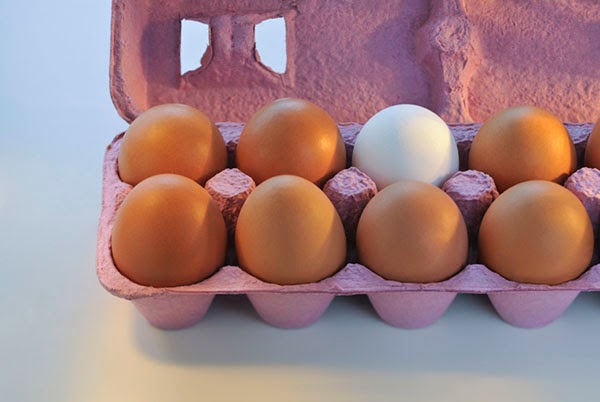
The placement of the carton of eggs within this photograph follows the graphic grid of the rule of thirds composition. The edges of the egg carton are aligned with the two horizontal lines, while the white egg has been placed on the axis point of two of the intersecting lines
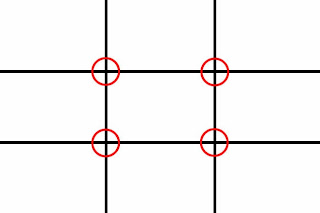
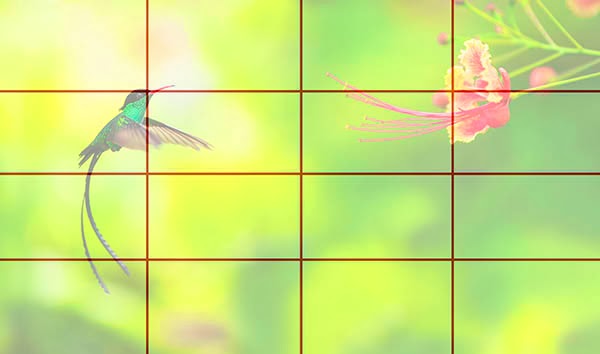
The grid pattern above is overlaid on the photo below.

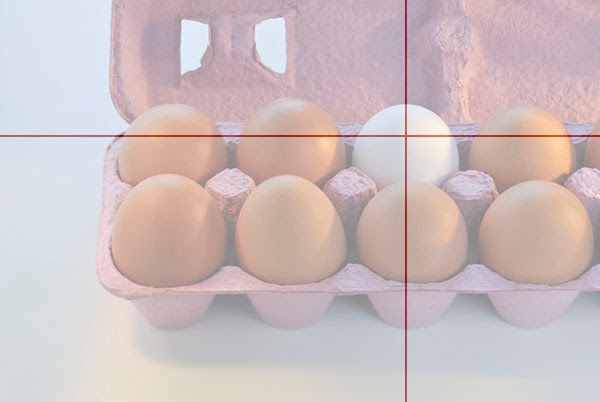
Overlaying the red lines demonstrates how closely the composition aligns with the grid of thirds. Intuitively, the mind will recognize this underlying pattern as it seeks a visual order to the placement of the elements. This instinctive discovery is similar to the recognition of harmony when listening to music.  
The rule of thirds grid is loosely based on one of the oldest harmonious grid structures called the Golden Section. The Golden Section refers first to a line that is divided so that the ratio of the two parts is 8:5. A Golden Rectangle has its sides in the same ratio, and when the rectangle is evenly divided with a grid that corresponds to this ratio it forms a series of evenly spaced, square boxes. Aligning our composition within the structure of this grid so that the lines coincide with the grid lines and objects are place on intersecting points appears naturally pleasing to the eye.

Of course "naturally pleasing" may not be the intended message the photographer is seeking to present, in which case objects and lines of composition may be intentionally placed outside the grid positions to create a feeling of discord in the viewer. In either case, working with the grid or against it, the placement relative to the intuitive grid relays a message to the viewer.

The rule of thirds grid suggests the use of an asymmetrical composition, but compositions can be symmetrical also. For these we need to work with more symmetrical grids.

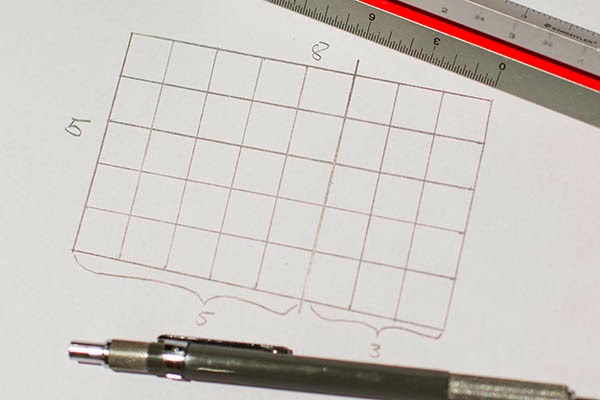
The grid drawn above, a Golden Section, is based upon a proportion of 8:5, a visual harmony that has been recognized for many years. The Greeks applied this divine ratio to the rectangular structure of temples, such as the Parthenon. 
One of the simplest uses of a grid is for placement of the horizon line. Low placement gives more emphasis to the top portion of the image, while high placement does the opposite. Placing the horizon line right in the middle does not emphasize one side over the other.

This very obvious placement on the lowest part of the grid allows the stormy sky to dominate the image, which in turn delivers a message about the vastness of the scene. 
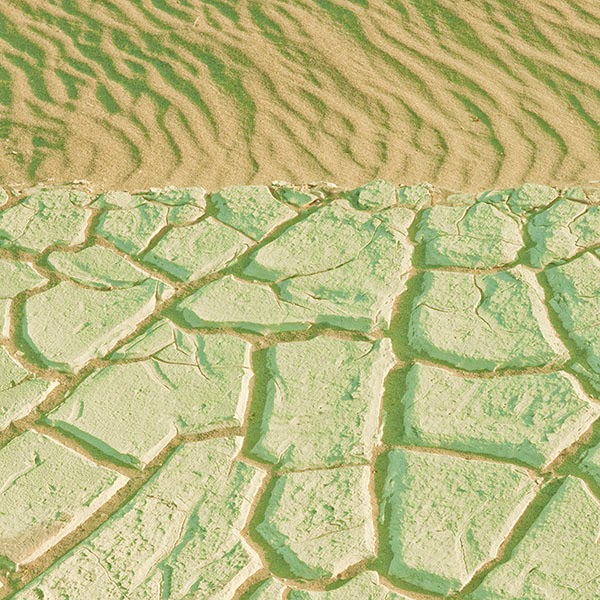
With the main dividing line (It doesn't have to be a real horizon.) placed on the top third grid line, visual emphasis is given to the cracked earth on the bottom. The sand lets me know I'm looking at a desert scene, but the large area of cracked earth tells me the story of the parched dryness of the place, which is the main theme of the photo.
The most important thing to keep in mind about composition is an awareness and use of the entire picture frame to tell the story. Most beginners place their subject in the middle of the frame with little regard for the surrounding area that completes the picture. The complete frame should be used to tell the story. Skill is needed to establish not only the relationship of the objects within the frame but, just as importantly, the relationship of the objects to the overall frame itself. An element introduced into the picture frame and not helping the main subject or idea, is hurting it instead. What is included is important. Where it is included and what relationship it has to everything else in the frame is crucial to good composition.

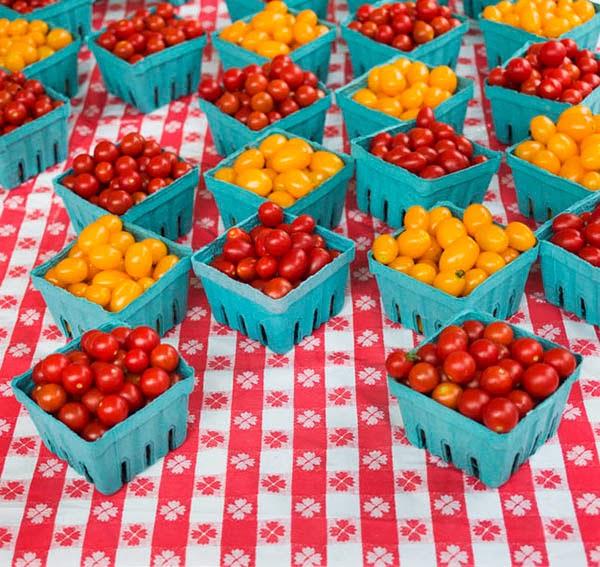
Here the objects are placed directly on an understood grid, their relationship to each other emphasizes the pattern. The design of the tablecloth adds to it, the shape and placement of each carton of tomatoes also sits on the grid, and a square format becomse the obvious choice for the containing picture frame. This picture could have been taken tilted off to one side or the other, but that would have been just a shot of tomatoes. Instead the objects were aligned deliberately based on a grid mentally imposed over the scene and the rhythm created by this grid becomes the main theme of the photograph.  
This is a situation where purposeful symmetrical placement of the object is meant to illustrate the inherent beauty of symmetry in nature. 
The thing to keep in mind is that the instant we decide upon a shape for our picture frame we are working with a grid. Sub-dividing this frame further provides a more organized surface area that can be used to tell our story.

Although I presented two of the more popular grids in graphic composition, they are not the only ones available. For most purposes, simply subdividing the area proportionately is and creating an incremented grid relative to the proportions is sufficient. Most of the grids used below follow that principle.

Below are some uses of grid based compositions:


I always worked with a grid screen in my cameras. Today it is even easier, since most modern cameras come with built-in grid lines that can be lit up and superimposed over the viewfinder frame.


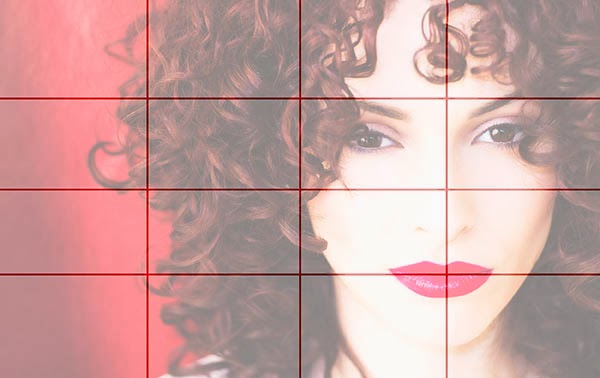
I published this image on my blog just a few days ago and am including it here to demonstrate that a grid layout can work even with a portrait.
There are a number of tools of composition that can help guide the eye and aid in telling the story and delivering the meaning the creator intends.

The human mind seeks patterns in a graphic display, and is constantly in search of order and meaning in this visual realm. Graphic artists know this and utilize grids as roadmaps that guide the viewer through the image and elicit a response to the visual stimuli created by the harmony or dis-harmony of alignment with this grid. That is the essence of graphic composition and one of the many tools photographers have at their disposal in creating images.

A subject plopped without thought in the middle of a picture is a blob devoid of meaning. The same subject, thoughtfully scaled, and place in relation to other objects within the frame and relative to the frame itself so it is infused with meaning is graphic composition.

Monday, November 25, 2013

From film to digital to platinum

A long time ago I did a series of images on the American Southwest, mostly on 35mm film. I had always wondered what these images would like as platinum prints. Now I'm about to find out. First I scanned the original negatives. The digital images shown here are done from those scans. Next I will have the scans converted to full size negatives and 11x14" platinum prints made from the enlarged negatives.

This church and the other angles of it below are of the Rancho de Taos Church in New Mexico. This church has always been a mecca for artists, one of the most famous views being that by Georgia O'Keeffe.


Friday, November 22, 2013

Photographing beauty with the Fuji X-E2

You can read my complete hands-on review of the X-E2 camera by clicking here: X-E2 - HANDS ON REVIEW.

There is no doubt in my mind that the new Fuji X cameras can be used professionally so I decided to give it a trial workout in a real situation. We had a beauty shoot scheduled with one model and I thought that would be as good an opportunity as any to see what the camera could do.

I had the Fuji X-E2 and three lenses: the 55-200mm Fuji zoom, Fuji 35mm f/1.4, and a Leica 50mm f/1/4 Summilux with a Fuji Leica M to X mount converter. On the APS sensor of the Fuji the 50mm lens was equivalent to 75mm, and I used it as my main portrait focal length. The enhanced focus-peaking combined with the split-image rangefinder mode of the X-E2 made it a snap to achieve pinpoint focus with the manually focusing Summilux lens.

For this shot I wanted a high contrast look and the color red to be the dominant color with the model's skin over-exposed to white. Normally I would have used a strobe for this effect but the X-E2 does not have a flash sync connector. Instead I used the built-in camera pop-up flash as the source of illumination. 

Two important changes in the X-E2 over the X-E1 made this shoot easier to pull off. The first was the ability to move the auto-focus point in AF-C (continuous focus) mode. When photographing models I strive for a pinpoint focus on the eyes, which means having a small focus point coupled with the ability to move it around for placement on the eye. The full screen grid of focus locations on the X-E2 was very helpful in achieving this. Most cameras have focus points congregating in a central area so it is sometimes hard to position one over an eye that is located in the corner of the image frame. The second important change was in the refresh rate of the EVF finder in the 3fps drive mode. This allowed me to actually see what was changing in almost real time.

The longer Fuji 55-200mm zoom lens was used here to compress the perspective a bit, while stopping it down a bit increased the depth of field.
The model had very beautiful, smooth, light skin that I wanted to emphasize. With the exception of the red lips shot above, I kept the contrast low and enhanced a monochrome color cast in each situation in keeping with the predominant coloring of the styling. I photographed in our daylight studio using all natural light. The only exception is the red lips shot where I used the camera flash. The X-E2 does not have a built-in flash sync so studio strobes were not an easy option.

For an ethereal look with low contrast I shot backlit against a strong window light with no fill whatsoever from the front. This meant opening the lens up to slightly over-expose the model.

For the fuller body shots I switched to the Fufi 35mm using it mostly towards its more open apertures settings. 

For all the tight beauty shots I relied on a 50mm (75mm eqivalent on the X-E2) Leica Summilux lens, which I used fairly wide open in the f/1.4-f/2.8 range.

Strong backlit window light provided the only illumination  here. There was no front fill, but in this instance I kept the exposure down to for a darker  foreground than I achieved in the ethereal blue portrait shot done in the same situation.
This is the camera/lens combo I used for most of the beauty shoot - a Leica 50mm f/1.4 Summilux lens mounted on the Fuji X-E2 camera using the Fuji Leica M to Fuji X mount adapter. I have to say, the Summilux looks really nice on the X-E2 body.

Thursday, November 21, 2013

Nikon SP - the ultimate digital retro camera

I realize that Nikon at long last introduced its own retro camera design with the Nikon Df. I have also heard that the real launch of the Df was delayed as a result of the tsunami in Japan, which explain why the Df does not have any ground breaking features.  It has the 16mp sensor form the D4, the limitinig 39 point focus screen from the the D610, and a price tag that is way above what these feature would justify.

In 2005 to celebrate the 50th anniversary of its legendary Nikon SP rangefinder camera, Nikon released a limited edition, black replica copy. Today that copy is selling for $4000 and more. This price is way above what a high end, digital, retro version of this camera type would sell for if it were to become available, and started me wondering what it would be like if Nikon had introduced the SP as a retro mirrorless camera instead of the SLR Df.

Let me put this another way: Think X-Pro-1 functionality, then think 24mp APS sensor like the one in a D7100 or D5300, next think about all the X lenses already available to use, and finally think about the chic retro design the Nikon SP already has. Put it all together and you could be looking at the coolest retro design digital camera of all time. I realize I'm just dreaming here, but a camera with these specs would easily out-shine the Df and give the Fuji X-series and Leica M some serious competition.

Even Nikon admits: "...among historical masterpieces such as the Nikon F, and high-class models like the Nikon F4 and F5, it is apparent that the camera most worthy of recognition as the "Best of Nikon" is the Nikon SP."
A Nikon SP rangefinder camera shown here with a 3.5cm f/1.4 lens mounted on it, a 5cm f/1.4 and 10.5cm f/2.5 lens nearby. On the upper left is a clip-on Nikon meter. This system was state of the art in 1957. 
Introduced in 1957 after a line of excellent predecessors, the Nikon SP had some innovative features for its time and quickly became a photojournalist's favorite tool. The Sp had two viewfinders, one with interchangeable frame lines for 50, 85, 105, and 135mm, and another next to it dedicated to 28 and 35mm wide angle. That is six built-in frames, more than any other camera of its time.   

The camera was quite expensive for its time costing over $3000 in today's dollars. A high end digital version today would probably come in at less than that. The price of a Df is considered high at $2700. 

The SP was such a legendary camera that in 2005 Nikon introduced a reissue black SP in a limited edition. A 2005 SP goes for thousands of dollars today, way more than a new digital version would cost.

The SP was designed to compete with and indeed surpass the Leica M3 rangefinder camrea, the first of the "M" series, which had been released in 1954.


Further development of the Nikon rangefinder was doomed with the advent of the SLR boom. To keep pace with competition, the first Nikon F SLR came out in 1959 just two years after the SP's introduction. The basic camera body and functionality was the same, but with an SLR mirror box replacing the viewfinders, and of course a whole new complement of lenses. The SP was discontinued in 1962 as Nikon turned its full attention to producing SLR cameras. 

At the time of its demise a prototype SPX rangefinder was on the drawing boards. It had built-in TTL metering, and a zoom finder for 35-135mm lenses.
Admittedly the idea of a retro digital version of the Nikon SP is just me rambling on, but think about it. How many of us would buy a retro SP rangefinder, X-mount, 24mp,  APS sensor-sized version with combo EVF-Optical viewfinder it Nikon made it available. My name would be first on the list. 

Now all I have to do is convince Nikon to produce it.

Wednesday, November 20, 2013

Water in blur motion with an ND filter

The remnants of old pier pilings dot the water all along the Hudson and East rivers in Manhattan. I have been wanting to do some photos of them where the water is a milky blur in contrast with the craggy sharpness of the wooden pilings. This past weekend I had the opportunity because the weather was overcast enough to lower the exposure time necessary to cause the blur. Even so, I needed an even lower shutter speed to achieve the effect I was after. For this I relied on a neutral density filter that would knock 9 full f-stops off the exposure. At an ISO of 100 that gave me 30 seconds at f/8 to f/11, enough time and depth of field for the motion of the water to blur while the pilings remained sharp.

One of the final images, taken with a Nikon D800 at f/9 and ISO of 100. I used a 9-stop ND filter to increase the exposure time, but probably could have achieved the same effect with a 6-stop filter instead. One problem with the 9-stop filter is that it is so dark you cannot even see the subject through the viewfinder when the filter is on the lens. I had to remove the filter and refocus for every change of scene.

This is the actual scene shown how it would have been without the ND filter. Even stopped down to f/16 I was only able to slow the shutter speed to 1/4 second for this version. 

This is the scene shot at 15 seconds. I wanted the water to be milkier than this so I increased the speed to 30 seconds for the final versions.


Tuesday, November 19, 2013

Shoot the moon with the Fuji XE-2

The moon, almost full, was setting this morning around sunrise. At the same time some interesting clouds were moving rather quickly providing abundant opportunities to form different compositions. I used the Fuji XE-2 with the two Fuji zooms to capture a number of variations.  Here are a few of them.


The XE-2 is an absolute joy to use.

Saturday, November 16, 2013

Fuji X-E2 - Hands on review

Hard to believe Fuji X-cameras have been around long enough to need an update move to a second generation. That is exactly what happened when the X-E1 was recently replaced with the X-E2. The X-E1 was a scaled down version of the X-Pro1 with no optical finder. Because the X-E1 was introduced after the X-Pro1 it had some advanced features the X-Pro1 did not have -- not exactly a desirable situation where the younger sibling out-shines the bigger brother.  This time around Fuji is introducing the X-E2 first, presumably to garner feedback it can use to enhance the X-Pro2, whenever that will be.

The X-E2 looks and feels like its predecessor. Upon closer examination we see the differences in layout of controls, and after delving deeper find that performance has also been improved with some additions and tweaks. The sensor is still 16mp, but is the enhanced X-Trans CMOS II version gaining raves inside the X100S, and is now coupled with the a new EXR processor II for improved performance. If you liked what the X-E1 delivered, you're going to like the X-E2 even more. Keep in mind that digital camera technology has reached a high level of sophistication so changes between models are not going to be as dramatic as they had been in prior years, as when sensor megapixels and ISO ranges were making huge leaps from one camera model to the next.

The Fuji X-E2 with 23mm f/1.4 lens and surrounded with the two Fuji zooms and 27mm pancake lens. 
Auto-focus has been improved once again to a spurious claim that this is the fastest auto-focus in existence. One of the more important focus changes for me has been adding the same 49 changeable focus points to the AF-C continuous focus mode. Previously, AF-C was limited to only one point in the middle of the frame, making it all but useless to a wide number of users, including me.

The rear of the camera has received most of the physical changes. The Q button has been moved to a spot where it is less likely to be hit accidentally.  The AF button whose function has now been taken over by the circular selector ring has been replaced with an additional Fn2 function button. The preview arrow has moved to the upper left and its spot replaced with a speaker.  The AF-L and AE-L button has now been separated into separate buttons.
Wireless capability has been built into the camera so you can see and transfer images on your smartphone using the Fuji APP. Image transfer only works with jpg captures. If you shoot RAW and intend to use this feature, you will need to include an additional jpg file in addition to the RAW.

The auto-ISO feature has been improved to include a minimum shutter speed setting. On the previous camera the low shutter speed was often set arbitrarily low. In addition, it did not allow compensation for the focal length being used, taking into consideration, for instance, that telephoto lenses require a higher minimum shutter speed to stop movement than shorter focal lengths.

The LCD monitor has been increased from 2.8" to 3".

A Lens Modulation Optimizer feature similar to the X100S has been added to the menu. This allows the camera to correct diffraction and some loss of corner focus in Fuji lenses. 
The viewfinder remains essentially the same as the one on the X-E1 except that low light frame refresh rate has been substantially increased from 20 to 50fps.

Continuous shooting in high has been increased from 6 to 7fps for about 28 jpg images. This is made possible by a faster write to disc time than the X-E1.  More importantly, at the low setting of 3fps the viewfinder now refreshes and refocuses between each frame. This is particularly handy in AF-C mode where you can now also change the focus point.

Battery life remains the same at approximately 350 images, which is what I was achieving in my tests.

The new PRE-AF option allows the camera to continually focus the lens even when the shutter button is not half-pressed -- a really good way to quickly drain your camera battery. For this reason alone, I keep it set to OFF. 
ISO sensitivity and excellent low light capability remain the same at ISO 200-6400 with extended ranges of ISO 100, 12800, and 25600.


Sample Images:

Individual focus points can now be selected in AF-C continuous focus mode.  The camera was quickly able to discern the difference between the foreground and Empire State Building in the background when taking this photo with the long zoom.

Click here to download a high res version of this image.  Taken with the 55-200 zoom lens at f/5.6.


Autumn leaves photographed with a +2 close-up filter on a Fuji 35mm lens set to f/1.4 for extremely shallow depth of field.

New York's Guggenheim Museum photographed on an overcast day with the 18-55mm zoom.

An autumn panorama created from two side-by-side images taken of the Turtle Pond in Central Park and combined later in Photoshop.

Photographed with the Fuji 55-200mm zoom at maximum focal length.  Quick and accurate continuous focusing with changeable focus points is important in wildlife shooting where the subjects are moving rapidly and unpredictably.

There is something about the color from the X-E2 that is really nice -- rich and vivid. 


Shot at wide open aperture directly into the sun with the 55-200mm lens.

Conclusion:

With this model Fuji has moved well beyond the introductory phase of the X-series with new features and modifications that make a real difference to a pro using this camera. Admittedly, many of these new features appear to be subtle changes, but taken together they substantially affect how the camera can be used dependably and repeatedly as a working tool. We take image quality for granted, auto-focus issues are a thing of the past. The X-E2 responds quickly and smoothly, exactly the way a pro camera should operate.

Fuji is building a strong reputation for listening to its client base and incorporating the changes and suggestions from their field use of Fuji products. There is undoubtedly a good reason that the X-E2 was introduced before an updated X-Pro1. It will give Fuji more time to apply what it will learn from X-E2 feedback to the new X-Pro2. I use both cameras because I do appreciate being able to switch over to an optical viewfinder, but there is something nice to be said about the compactness and handling of the X-E2 body.

As stated earlier, ground-breaking changes between digital camera models are behind us. One question that pops to mind is whether or not a switch from an X-E1 to X-E2 is worth the price. This says a lot about the X-E1, which is an exceptional camera in its own right. Nonetheless, the changes made to the X-E2 address issues that are important to anyone using these cameras in a work environment. Now that I have had time for a hands-on assessment of the X-E2, I can say unequivocally that it was well worth the switch.

Taken with the 35mm f/1.4 lens shot wide open and with a +2 close-up filter.
If you are planning on purchasing this camera or lens, you can help support this site at no extra cost to you by purchasing from one of our affiliate sellers listed below -- and thanks for your support.


Fujifilm X-E2 Mirrorless Digital Camera Black Body  is available at:  BH-Photo    Amazon
Fujifilm X-E2 Mirrorless Digital Camera Silver Body  is available at:  BH-Photo   Amazon