Tuesday, March 10, 2015

Platinum printing workshop at the Penumbra Foundation

This past weekend I attended a digital-to-platinum printing workshop sponsored by the Center for Alternative Photography at the Penumbra Foundation in New York, and taught by the inveterate fine art platinum photographer, Carl Weese,  CAP has studios and darkrooms dedicated to alternative processes, such as tintype, platinum printing, Daguerreotype, Calotype, and more.  What I found most attractive about this platinum printing class is that teaches how to create a platinum print from a digital image.

Platinum/palladium printing is almost as old as photography itself, but it did not become really practical until the late 1800's. Its extensive tonal range, and the fact that the platinum/palladium mixture embeds itself in the paper it does not mask the surface texture of the paper. This results in a tactile experience akin to water color painting.

The Penumbra Foundation is located at 36 East 30th Street in Manhattan. 
Platinum is a contact printing process using a strong UV light source. Originally, in its early days, this meant exposing the print to sunlight. Today we use high intensity UV fluorescent lamps. The size of the negative will determine the size of the image -- not a problem when using large format, but for small negatives or digital, the image needs to be enlarged and reversed onto a transparency medium.

Platinum printing is a mechanical process not too difficult to master, but prepping a negative is another story. In some respects made more difficult because it is a bit counter-intuitive for those of use already familiar with silver-based black & white darkroom printing.

Carl working with one of the class members to prepare a digital negative of a scanned image. The negative for contact printing prints out nicely on an Epson 3880 printer using either Pictorico or Fixxons transparency medium.


Class participants going over the process of creating a negative. 

Platinum or Palladium or a combination of the two are mixed with ferric oxilate to make them more reactive to light. Even so the mixture is only responsive to long exposures to a strong UV light source. We ended up with a 7 minute exposure time. 

This shows the chemistry that is mixed just before use:  equal amount of ferric oxalate palladium or a platinum/palladium mix that together is the same amount as the ferric oxalate. For a small print, for instance, we were using around 10-12 drops of each. A couple of drops of Tween 20 are added to facilitate the spread of the mixture over the paper. 

The platinum/palladium is applied to the surface with either a brush or glass rod. 


Once the paper is sufficiently dried it is sandwiched with the negative and exposed in a UV box -- in our case, for 7 minutes.


Now for the fun part. The exposed print is dropped into a tray and the developed immediately poured over it. Talk about instant gratification: The image appears immediately, although it takes a 90 seconds to fully mature.

Here the prints are being treated to a series of water and fixing baths after being developed. 


Hang them to dry and you're done. Nice thing is that platinum prints are much more impervious to curling than silver prints,, and are ready to go as soon as they are air dried. 

Negatives are made on a computer using Photoshop or other suitable post-processing software. The file is printed on transparency material on a printer like the Epson 3880, and finally the print is made by direct contact with the negative. 
Carl Weese gives his digital to platinum workshop several times a year at the Center for Alternative Processes. It's well worth the effort for anyone who, like me, has a desire for the tactile experience of photography -- a great way to spend the weekend.

One of the platinum prints I made this weekend of a digital photo taken with the Fuji X-T1 of a Leica 1 from 1931. 

Friday, March 6, 2015

A snowy day in Gotham with the X-T1

We've had a very cold winter this year in New York, but most of the record snowfalls that have been making the news have skirted us to the north. Yesterday was different, the city received one of those fairy tale snowy days where the snow falls lightly all day with accumulations that make everything look like a winter wonderland -- nothing too excessive. Temperatures on the higher side make the snow sticky and the lack of wind allow it to stick to the trees. It snowed all day. In the morning the snow was accompanied with a mist that also covered the city. In short, conditions were perfect for some snowy day photos of Gotham.

I had a shooting in the studio in the morning so I missed the best part of the mistiness, but I headed out in the early afternoon and stayed out all day until around sunset photographing with my Fuji X-T1. I packed only two lenses, the 18-55mm and 10-24mm zooms, but pretty much used the 18-55mm for most of the day. I photographed for about four hours with the camera and lenses exposed to the elements the entire time, adequate proof that their weather resistance works well.

I worked the day for both color and monochrome images keeping the X-T1 set to record both RAW and jpg. With the camera set to monochrome I did not see the colors in the viewfinder and made my judgments of composition based on contrast. It was a good way to work in such a low contrast, almost colorless scene.


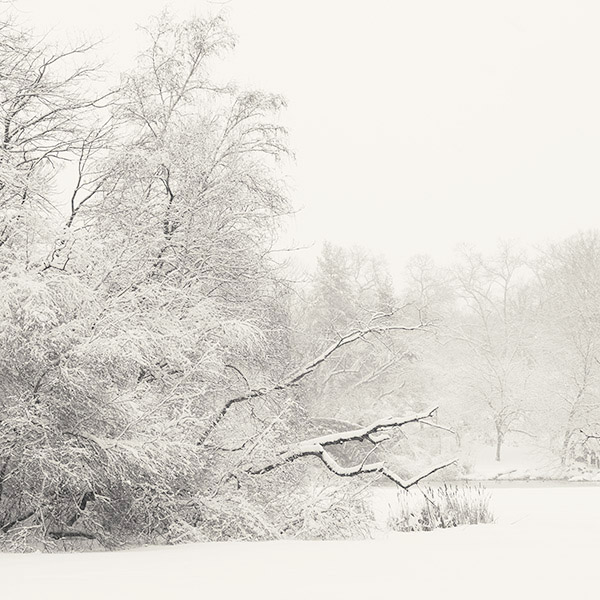
I began my excursion at on the Pond in Central Park. The snow was falling consistently enveloping the scene in a white haze allowing only very subtle colors coming through. I wanted to preserve this whiteness without over-punching the colors. I set the camera to over-expose by 2/3 stop to keep the scene bright. 


I hadn't expected to be photographing any wildlife, but the birds were out in profusion, offering a colorful punch to the flat background.


I kept switching back and forth from color to monochrome while photographing the area around the park. Most of the monochrome is to supplement my Platinum fine art portfolio.


I left the park early and headed down to Times Square because I was curious about how the snow would look there around sunset. 

The city steam created huge clouds that permeated the area and absorbed the colors from the light of Times Square. This view is looking south past the snow covered stature of George Gershwin. 

I couldn't resist this little street scene reminding everyone that it might be time to take a vacation to warmer climates. 

Continuing on from Times Square, I walked down Fifth Avenue, grabbing some shots of the city icons in both color and monochrome. 

The New York Public Library


Flatiron Building with snow-covered trees in Madison Park


The Empire State Building juxtaposed against an old apartment building surrounded by snow-covered trees.


Running low on light, but still hand-holding the X-T1 because of the high OIS of the 18-55mm lens, I took this late photo of the Chrysler Building past the silhouette of trees and building.


The New York Public Library past some snowy trees. 

The camera and lens were covered with wet snow the entire time. I have a procedure for when I return from an inclement weather shoot to take care of the equipment before I do anything else. One of the most dangerous times for the gear is when it first comes in from the cold and hits the warm interior air. The snow melts quickly into water that can seep into the camera much more easily, and moisture from condensation can form on the interior elements of lenses.

First thing I do is pull the battery, and dry off any moisture from the surfaces of the camera. Next I disassemble the camera and lenses, taking off any caps, lens hoods, removing the lens from the camera because the point where the lens mounts to the camera is a dangerous place for moisture to seep in. I rack out the zooms so they are fully extended. The equipment needs to breath so it can dry in the warm air so I open everything that moves, such as the tilt screen, trap doors that hide the SD card and other slots, and the battery compartment door, I also remove the accessory grip because it especially acts as a trap for moisture. I lay everything out and allow it to air dry thoroughly before reassembling it.

Thursday, March 5, 2015

Some things I like about the Fuji X-T1 for lifestyle photography . . . and a few things I don't

This is another post based on the comparison of the Fuji X-system instead of a DSLR for shooting lifestyle photography. Lifestyle is the main commercial subject I shoot, and has for decades. So I've done it with a lot of different camera systems over the years -- mostly with Nikon DSLR, but also with Canon when Nikon didn't have an FX camera, and with Hasselblads.  Sometimes (rarely) I even used a Leica. This includes both film and digital systems. My primary "weapon of choice" for the digital era has been the Nikon DSLR. It focuses fast, shoots fast, is indestructible, and has complete support in terms of lenses and accessories -- nothing not to like, except that it, like most pro DSLR's, has gotten quite heafty over the years.

Along came the Fuji X cameras with their smaller, but powerful APS-sized sensor and small footprint. Their sluggish EVF finders, made them problematic initially, but rapidly improved to a point where they can keep up with the action, and keeping up with the action is one of the most necessary parts of lifestyle shooting, at least the way I shoot it. For most of my lifestyle photography I try to keep the model in constant motion. It might only be a slight movement of the head moving about, or a cyclical action I call a "loop", after a film loop, where a small scene repeats itself over and over again and I try to stop it at the peak of action. When the models are kept in such a fluid state, they tend to look more real when they are caught in the middle of a movement as opposed to when they are positioned statically in an environment. Easier said than done, and very subtle in terms of results, but this is what makes some of these very simple situations have a bit of life to them.

I've done a shot like this many time so I was prepared for the Fuji not to be able to focus on the girl's eye. Her eye is close to the microscope eyepiece, her hand is also in the way. The 56mm was set to f/2 to throw the foreground and background out of focus. The scene is back lit with no fill. I was so sure that the X-T1 would not be able to grab focus on the little girl's eye that I also resorted to reshooting the scene with a Nikon D750 just to make sure I had something in focus. To my surprise to Fuji came through like a champ. It never missed focus.  

There are other tricks I use. Shallow depth-of-field with areas of foreground and background out of focus. This, of course, means relying on fast aperture lenses wide open to further complicate of freezing action when the model is in motion. The object is to focus on the eye, preferably the near eye. In close, the eye may be the only thing in focus. Even the ears and tip of the nose will be soft. This calls for a camera system than can pinpoint the focus and allow me to follow it as the model moves about, That is a lot of stress on a camera's autofocus system. Modern Nikon DSLR cameras do this beautifully, even in the worst -- as in dark and backlit -- situations.

One thing most full frame DSLR cameras cannot do is extend their focus selection to the very edges of the image frame.  This often calls for the image to be cropped later just so a focus point can be put on a remote part of the frame. Cropping an image means you want to have enough resolution so you can throw some of the area away.  Full frame, high megapixel cameras help with this.  A camera like the Fuji X-T1 has a smaller sensor and low 16mp resolution. But it has the advantage of having a lot of focus points distributed over the entire area of the frame, even into the remote corners, and this does away with the need to crop the image. Because of the proprietary design of the sensor in a Fuji X camera, when the full frame is used the results are really almost as good as one from an actual full frame camera.

Here's a fun shot for an autofocus system. The Fuji 56mm f/1.2 lens used at f/2.2 in close with focus placed on the left eye. The girl was moving about constantly, she was also moving the out-of-focus toy in front of her and sometimes it passed in front of her eye, as it did here. The scene is back lit with no fill. I did not initially think the X-T1 would be able to continuously follow focus in this scene -- but it did.

The optics available for the Fuji X cameras are superb. Fuji lenses have always been good, but now that they only have to cover a smaller image area, they are even better. It's difficult manufacturing a fast aperture, quality lens to cover a large area. Really good full frame lenses are harder and more costly to make.

The scenes below are from a fairly simple lifestyle we did over two hours in the studio with (mostly) available light. I had decided to use only the Fuji X-T1 with three fast primes -- 56mm, 35mm, and 23mm -- for the entire shoot. I had the Nikon D750 ready as backup, but didn't want to use it because dealing with the RAW images from two different cameras only complicates the post-processing workflow.

I like using the X-T1 when shooting RAW for post-processing in Adobe Bridge and Photoshop. The RAW images coming out of the Fuji are so good that then need very little tweaking in post. Naturally, this makes my job a lot easier, and that makes me a lot happier.

Dealing with the Nikon DSLR shots in the same work flow of ACR and Photoshop requires much more work. The Nikon RAW files are not idealized for Adobe. They are set up to work with Nikon Capture NX-D software. This software is limited, but if I pass a Nikon RAW image through it, it, too, is much easier process because the Nikon software integrates with the Nikon camera RAW file to make all the lens and built-in camera corrections of the system. On thing I have tried is first passing the Nikon files through its Capture software first to create a 16-bit tif file, and then processing the tif file with Photoshop. Why Photoshop?  Well, it's a powerful program and I've been using it since it first came out so I'm very familiar with it. Plus the Capture software is very limiting in what it can do. But enough of that. I'll save post-processing of a Nikon RAW file for a future blog post.

One reason I do these comparative posts is that I know other photographers have been thinking, as I have, about switching -- or at least supplementing -- their DSLR systems for smaller, lighter, more compact, and less expensive mirrorless systems like the Fuji X-series. I've been trying the Fuji X-T1 out on many professional shoots to a point where I prefer it not just for its compactness, but also for its image quality. It takes me a long time to switch camera systems. I run them in tandem for a long time. I am often asked what is the difference between a pro and an amateur, and my response has been: When shooting, a pro must come back with results. An amateur can say, "Oh, that didn't work. Maybe next time."  A pro cannot say that, otherwise he or she won't be a pro for very long.

This is not a biggie, and getting to be not an issue as more cameras come out with tilting screens, but I do like the tilt screen on the X-T1 to quickly re-adjust a scene by shooting it from a different angle. Shot with the 23mm Fuji lens set to f/2 one of the niceties is that the X-T1 live view screen can focus much faster and more accurately than a DSLR in live view. If you've ever tried moving the focus point around on a DSLR live-view screen, you know what I mean. 


The girl was moving abound quickly, focus was shallow with a lot of disturbing elements to add confusion to the AF system. Nonetheless, the X-T1 with 56mm set to f/1.6 had no trouble holding a focus on the girl's eye. 


Hmmm...looks like I'm in for some competition. 


OK, DSLR wins on this one. We hid a tiny Nikon flash behind the tablet to light the girl's face. If there is one thing the Fuji needs to compete with the pro DSLR systems it is a fully integrated flash system. I'm sure Fuji will get there. They have a good track record so far. In the meantime, I'll continue shooting scenes like this with a Nikon. 

Wednesday, March 4, 2015

Sony announces 4 new FE lenses for its full frame A7 series cameras

It has taken a while for Sony to come across with extended lens support for it much admired A7 series camera, but the wait is over -- at least partially -- with the announcement of four new FE lenses.

The charts on these lenses indicate that they will be superb optically. The only question I've always had with the A7 camera series is whether a full-frame mirrorless system promises enough of a difference in terms of features and compactness to be a viable alternative to a true DSLR. As the chart below indicates, the lenses are no light weights, and, although the A7 itself is a more compact camera, than a comparable DSLR is its convenience obviated by the larger optics demanded by full-frame.

One thing that cannot be denied: The A7 system is excellent for what it can deliver in terms of image quality, and the four lenses announced today only raise the bar even further.

The A7 camera itself might be a light-weight, compact alternative to a full-frame DSLR, but if this comparison of the 35mm f/1.4 lens is any indication, the lenses for the A7 system will have to remain large enough to do the job, unless they sacrifice features to make them smaller, as was the case with the 70-200mm lens when it came out with a f/4 aperture instead of the typical f/2.8 most pro photographers use for this focal length. 


Sony Distagon T* FE 35mm f/1.4 ZA Lens - $1598

Available for pre-order at: B&H-Photo   Adorama    Amazon


Sony FE 24-240mm f/3.5-6.3 OSS Lens - $998

Available for pre-order at: B&H-Photo  Adorama  Amazon


Sony FE 90mm f/2.8 Macro G OSS Lens - $1098

Available for pre-order at: B&H-Photo   Adorama   Amazon


Sony FE 28mm f/2 Lens - $448

Available for pre-order at: B&H-Photo   Adorama  


Sunday, March 1, 2015

Nikon D5500 -- Hands on review

The latest crop of APS-sized cameras are truly amazing. Just a few years ago a camera like the new Nikon D5500 would have been a dream come true. Cameras like this have opened the field of photography to shooters who would otherwise never been able to enter it. It has all the features and capabilities of the "big boys" in a much smaller, less expensive, not as durable body -- for what it is and what it can deliver, it is sensational.

The Nikon D5500 outfitted with a Nikon 18-200mm f/3.56-5.6 lens with VRII. I used this combo for the tests done in this post, and found it to be pretty much a perfect travel kit -- one light-weight camera, one light weight lens with VRII to obviate the need for a faster aperture. Add a super-wide like Nikon's 10-24mm f/3.5-4.5, and a macro like the Nikon 40mm f/2.8 and you have a very complete, compact package ranging from an equivalent 15mm to 300mm. You could cover almost anything with a range like that. If you want to keep the price down, you could substitute the Sigma 10-20mm f/4-5.6, or the newly revised Tokina 11-16mm f2.8 Pro DX II as your super wide. 

The D5500 has a 24.2MP sensor coupled to a Nikon Expeed 4 processor and optical low-pass filter removed. There is a 39-point autofocus system with nine cross-type sensors, which is more than adequate for an APS size camera. The video specs are incredible with full HD at speeds up to 60 fps with full autofocus. The video ability alone is going to make this a popular "crash camera" for video crews, although the camera's video credentials merit their own respect as a stand-alone unit.

To increase the high resolution even further, the D5500's image sensor unit does not integrate an optical low-pass filter. Built-in HDR works to extend the tonal and exposure range of a single image by recording two separate exposures and blending them together in order to gain greater highlight and shadow details with an extended range of mid-tones. The HDR function only works on jpg images, which is where it would be most needed.

The tilt screen is a welcomed feature on the D5500. It twists, it turns, it contorts itself to almost any position -- perfect for those unusual angles and very handy for video, not to mention those selfies. 

Oh, and did I mention the touch-screen? Yep, the new model has that, too, along with wireless capability for transferring images as well as taking the photo with an iOS or Android smartphone or tablet. The motor drive clips along at 5 fps -- no speed demon, but plenty fast for most needs.

There is only one control wheel on the D5500 so it has to do double-duty by switching it to handle various functions. The Fn button can also be programmed to handle the most used functions, but all are readily available on the new touch screen called up with a touch of the "i" (for info) button. Not accustomed to this feature on other cameras, it took me a bit of time to get used to it. After awhile I was able to make changes quite rapidly and without fumbling around. ISO was particularly easy to change this way. You can even choose the focus point by touch.

Most of the important camera controls can be changed using the new touch screen. On the left the ISO is selected, and on the right the aperture is changed while the camera is in aperture priority mode. 

TOUCH SCREEN FUNCTIONS:

All these features are packaged in a camera body that is slightly smaller and lighter than its predecessor. 

The higher ISO range of the D5500 rivals any camera out there with its low light noise control to over 1600 and even up to  the 3200-6400 range under the right conditions. 

Compared to the full frame D810, the D5500 is a very small camera. 

The D5500 has an Effects shooting mode that provides 10 different filters for both still images and video. The Night Vision effect is particularly interesting as it increases the camera's sensitivity to ISO 102,400 to produce a monochrome only image that is a lot like seeing in the dark with night vision goggles.

This photo was taken using the D5500 Night Vision effect. The image is delivered as jpg only at extremely high, monochrome ISO. In this scene I actually could not see any detail in the building with my naked eye. 

The internal GPS function of the previous D5300 has been removed, possibly for reasons of privacy or to allow the camera to fit a smaller profile.

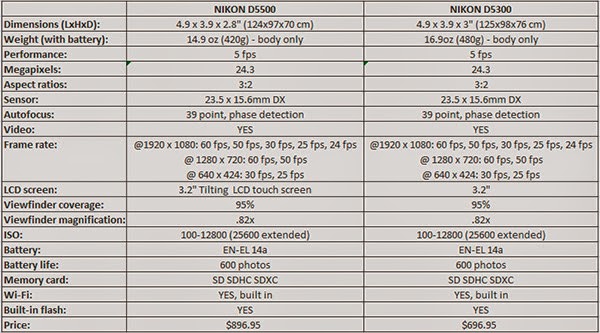
SPECIFICATIONS:


Aside from the addition of the touch screen, and removal of the low-pass filter, there wouldn't be much to shout about in this model over the previous D5300.  Thing is, the D5XXX series has impressed me from the beginning. What it delivers, for a price currently reduced to $796.95 is impressive.

Perhaps the most important adjunct to the D5500 is that it has access to Nikon lenses. A new photographer could enter the Nikon system with a D5500 and one do-it-all zoom, and later progress to other lenses, all of which will fit the other Nikon cameras in the lineup, should our new photographer decide to jump up a level.

The D5500 body is a carbon-fiber monocoque structure making it the lightest camera in the Nikon DSLR lineup. A newly designed right-hand grip is deeper than before providing a comfortable grip for photographers.

Consistant with Nikon's consumer based DSLR's autofocus on the D5500 is available with AF-S and AF-I lenses; autofocus is not available with other type G and D lenses,

The D5500  has the 3D color matrix metering II similar to pro model Nikon DSLR's.  Place the focus point on a subject within the frame and it will track the objects and adjust focus as it moves across the frame. In this photo and that of the vulture below, the focus point picked up the subjects on the left of the frame and followed them as the moved quite rapidly across the frame to the right side resulting in continuously focused images at 5 frames per second.


The Adobe RAW converter was not yet available for the D5500 so I recorded the test images in both RAW and jpg. When I thought I needed a RAW conversion, I used the Nikon Capture NX-D software to convert the RAW to a 16-bit tif file for further processing in Photoshop and Adobe camera RAW.

For my tests I chose to equip the camera with the Nikon 18-200mm zoom lens instead of higher end pro model optics because I felt this is what most people who buy this camera would use. The sensor on the D5500 is so good, however, that coupling it with higher end optics -- as I did for my D5300 tests --  produces very fine, high resolution images that rival the pro lineups of many competitor DSLR models. The D5500 is a perfect, compact camera to carry around with only one zoom, or can double as a spare body (referred to as a "crash camera") for pros and videographers to use when they don't want to risk their more expensive equipment by placing it in perilous situations. Better to risk a $800 camera than a $6000 D4s or $2300 D750. I did this for a few scenes of my skate boarder scenes by placing the camera on the ground just below his jump and triggering it remotely.  Turned out to be a good idea as one time his board did go flying right into the camera -- thankfully, with no harm done.

Honestly, if you said to me that I would have to content myself with using only this camera from now on for all my professional, personal, and artistic photography, I wouldn't complain. It is definitely up to the task.


CONCLUSION:

There are only a few significant differences between the D5500 and D5300 -- the movable touch screen, lack of a GPS, and a smaller body. If those items don't mean much to you, you could save $100 by picking up a D5300 instead. Image quality is going to be the same.

I happen to like a tilting screen and find myself using it more and more on the cameras that have it for gaining quick access to more dramatic angles by holding the camera very low to the ground, or taking a shot from above the action by holding the camera over my head. I find myself using these techniques all the time now, and it did come in handy when photographing the skate boarder with the D5500.

If I already owned a D5300, would I trade up? Probably not. I'd need more of an enticement than a touch screen -- although the tilting aspect is nice.

If you are in the market for a reasonably priced consumer camera that can deliver image quality up there with the best pro DSLR's, this should be your first choice. When I look back on the very brief history of pro-quality cameras, I realize that what this camera can deliver for its price is amazing.

From what I can see and what it can deliver the D5500 is best of breed in mid-range DSLR camaras currently on the market.


If you are planning on buying this camera, you can help support this site at no extra cost to you by clicking the link and purchasing from one of our affiliate sellers listed below -- and thanks for your support.

The Nikon D5500 in black can be ordered for $796.95 from: 
BH-Photo     Amazon    Adorama

The Nikon D5500 in red can be ordered for $796.95 from: BH-Photo   Amazon