Wednesday, February 25, 2015

"Hazing" an image in Photoshop

I constantly have a camera with me, and when I am not taking photographs directly, I often pick up details and backgrounds I can use to combine with other images later in Photoshop. Yesterday I spotted some sheer window curtains and photographed them out of focus with my X-T1 and the new 18-55mm f/2.8 I have been testing -- an occasion when the f/2.8 came in handy at full zoom extension to blur the curtains.

Here is a small sample of some of the blurred images I captured of the sheer curtains:

The image on the right is closest to the actual color. I enhanced the color on the left image and changed it in ACR for the middle image.

I use this type of background image in a technique I call "hazing". In Photoshop I place an image of this type as a layer over a straight photograph, and then change the Blending Mode of the layer, usually to Hard Light, but sometimes to Multiply, Overlay, Screen, or Soft Light.

Below is a selection of the original images I wanted to "haze".

Nothing wrong with the original images, but adding the haze re-purposes them for designers to use as more of a neutral background. 

All of the images below used the hazing layer added in Hard Light mode. This can mute the overall color and over-lighten the image. To counter act this I move the image into the LAB color space and enhance the colors, then, after reconverting the image to RGB, I add a curve or levels layer to boost the contrast.


This photo was done using one of the warmed up blurs plus an additional sepia-colored adjustment filter layer.


Same technique used here, but I wanted to achieve a Pointillist painting technique to it so at the end I duplicated the image as an additional layer, added some uniform, monochrome noise to it, and added opacity to the layer to tone its effect down a bit. 

The Hazing technique comes in handy on a photo outing to the zoo, which can be problematic because of all the distracting environment elements that have to be avoided. 


Monday, February 23, 2015

Retro car meets my retro Fuji X-T1

We had just finished photographing some skate-boarding yesterday when this 1962 vintage Dodge pulled into the parking lot near us. I had the Fuji X-T1 fit with the new 16-55mm f/2.8 lens that I am testing.

Nothing like using a beautiful retro camera to photograph a beautiful retro car.


Sunday, February 22, 2015

Dreaming of spring

I took this photo in Florida today, a reminder that spring is only a month away.

Taken with the Fuji X-T1 and Zeiss Touit 50mm macro lens at f/8.

EX LIBRIS - a portfolio of photographs on printing

I have been assembling these photographs for several years with the idea of uniting them into a portfolio I am calling "Ex Libris" on the topic of the early book printing. Just recently the project has begun to coalesce into something resembling a coherent whole.

Most of the images were photographed wherever I found them, although recently I have been doing some specific still life setups on the theme. I am still not sure what printing process I will  use for the portfolio images. I am leaning towards a very limited edition of 9" x 9" or 10" x 10" gum bichromate prints as producing the most suitably somber, dark look I am seeking to achieve, although I am also considering larger 12" x 12" platinum prints, or even printing the images digitally -- so many decisions.

There is something nostalgically enticing in a very meditative way about the manual process of printing. I tried to capture this feeling in this series of images. Not all of these images will make the final cut to be included in the portfolio. I am still deciding among them and some others I have.


Decorative metal punches for the book cover.


Ancient manuscripts with vellum covers in the library of the Valldemossa monastery in Spain. Early printed books were sold without covers, as the owner was expected to have the book bound later. 


Detail of the hand of Leonardo Da Vinci holding a book,  from a statue in Florence.


A type setup for printing.


Found in a monastery in Valldemossa, Spain, the skull and book was to remind the monks of the ephemeral quality of life.


Four trays of Garamond fonts.


Detail of an old printing press with rollers and handle.


This open book with moving pages was photographed with the Fuji X-T1 and Zeiss Touit 50mm macro lens at an exposure of 1/5 second to blur the moving pages. 


A mix of individual metal fonts in varying small sizes.


Large wooden number fonts. 


I took this photo in obvious homage to Shakespeare's Macbeth:  "Out, out brief candle!"  It seemed to fit the series theme. series. 

"To-morrow, and to-morrow, and to-morrow,
Creeps in this petty pace from day to day,
To the last syllable of recorded time;
And all our yesterdays have lighted fools
The way to dusty death. Out, out, brief candle!
Life's but a walking shadow, a poor player,
That struts and frets his hour upon the stage,
And then is heard no more. It is a tale
Told by an idiot, full of sound and fury,
Signifying nothing."

Macbeth Act 5, scene 5, 19–28


Thursday, February 19, 2015

Hyperfocal distance - achieving maximum focus in landscape photography

From time to time I receive emails from readers asking pertinent questions about aspects of photography and/or equipment. When I receive one, like this question from reader David, that is probably relevant to many readers, I will make a blog post of my response where I can also add more details. 

Here is David's question:

"My aim is to use the 18-55mm kit lens with the majority of shots taken at the widest end.  I have in mind setting the lens at Hyperfocal distances, based on a crop factor of 1.5 and a circle of confusion of 0.02. I think the first figure is reliable, but I'm not sure about the second in relation to the X-E1 - perhaps you could confirm.

I have already done some testing at home using the attached table (which come from the well respected DOFmaster site).

In my experiment I carefully measured distances at apertures of f8 and f11 using a tripod and a printed card as the subject.  I set the lens manually at the hyperfocal distance, using the EVF distance scale. I was disappointed to find that the closest point of focus was not as sharp as I had hoped.  Have you any idea why this may be? 

I did a further test on aperture f11 and this time set the distance scale at 4 feet (2/3 of the way between 3 and 5 feet).  This resulted in a sharp image from 3.5 feet.  This would suggest that the distance scale is not accurate.

Any suggestions you have to overcome the problem would be much appreciated."

Using the extreme depth-of-field by using the hyperfocal distance may not be the most desirable way to achieve what you want. It is often better to come to an understanding of what you want in the scene and work from there. In this image the point of focus was placed on a specific area, the foreground grass, and the background was allowed to drift imperceptibly out of focus. We don't notice this because the sharpness of the foreground detail keeps us thinking that everything is in focus. Had the reverse focus been used with the camera set to infinity for the background mountains, the image would have lost detail in the foreground where it is most noticeable.  This photo was taken at f/11 with a 35mm lens on a Nikon D3X. 
For anyone who might not know what it is, the hyperfocal distance is the focus distance point in a scene that will achieve the maximum over-all focus for the scene at a given lens aperture for the particular lens you are using. The key word here is "maximum". This is not saying that "everything" will be in focus. There is a big difference. Much of the ultimate focus results will depend upon -- and differ -- with the focal length and aperture you use.

At one time all lenses had a depth-of-field scale printed right on them so the photographer would know exactly what was in focus for any given aperture. In this example of a Leica 28mm Summicron lens the focus is set at about 7', and the depth-of-field (DOF) scale indicates that with an aperture of f/11 everything from 4' to infinity will be in focus. The maximum DOF of this lens would be achieved at f/16 and the DOF indicator placed so that the infinity mark is at 16. We can then read the point of focus and the distance closest to the lens that will also be in focus. 
A problem shooting digital lenses is that they do not perform at their best when stopped way down into the f/16 and small range. It is much better in terms of resolution to use the lens at its sweet-spot of around f/5.6 or f/8. This makes achieving a complete focus from foreground to background very difficult. 

I prefer to use work-around solutions to achieve the same effect. 

First, you can use a tilt-shift mechanism with a Nikon lens on the Fuji X. There is one available for the Fuji XF mount. I discussed in a previous blog post here. (You can purchase it here on Amazon.) Of course, this presupposes you have a Nikon lens of the desired focal length available. Not the most practical solution. 

Actually, hyperfocal distance, or what I will call "aparent hyperfocal distance" is dependent more on the level of sharpness we consider to be acceptable. This brings me to the second work-around, which is the most practical:

Rather than simply try to get everything in focus, try narrowing your own mental focus about what is important in the scene and achieve a primary focus on that allowing the rest of the scene to go a bit softer. This is the method I, and many other landscape photographers, often use. It works well on several accounts. First, it forces you to make a decision on what is important in the scene and zero in on it. Second, it allows you to place the focus point closer to the foreground where you can achieve complete foreground focus of the elements in the scene that most benefit from sharp focus. Finally, you are allowing the background scene to go slightly soft, but that is the area with the least actual detail anyway. Plus its softness may not even be noticeable because of the magicians slight-of-and trick to distract your audience into looking at the foreground detail. Let's look at a couple of samples below.

Two variation where the camera was moved in close to foreground scene and focused on an important story-telling detail that leaves the entire background drifting slightly out of focus. The viewers doesn't really notice the lack of sharpness in the background because their attention is distracted to concentrate on the detail in foreground.
In this scene and the one below, focus is placed on important foreground detail and the distant background is allowed to drift to a slight softness. The images appear to be sharp over-all, but in reality they are not. 


If you are really determined to achieve a photo with everything in focus, then you might want to consider this third, alternative approach of a stacked-focus image. To do this, you take a series of photographs while moving the focus point slightly backward with each exposure until you have covered the entire area from front to back. Later the images are assembled with a program like Helicon Focus into a final image where the entire scene is in focus. The final results can be a mind-blowing experience for viewers because we rarely see real life this sharp. The image below is an example of stacked focus.

Over twenty photos were taken to form this image. Each exposure was focused at a slightly different point moving progressively from front to back. All were later assembled to form on over-all sharp image. Click here to download a high res version of this photo. 
Bottom line here is that it more important for the photographer to come to a decision about what is the most important element in a scene and then judiciously relate that area to the whole by using depth-of-field, as opposed to randomly selecting a hyperfocal distance that bears no meaning in and of itself other than achieving a deep focus. As always, it is the photographers aesthetic decisions that are most important in any photograph.  


Tuesday, February 17, 2015

Lifestyle photo session shootout with a Fuji X-T1 and Nikon D750

For the past year I have been going back and forth on my choice of camera to use for lifestyle photography. For me this has always been the domain of high speed Nikons like the D3 and D4. They focus quickly and accurately and can follow the action at a blindingly fast speed. This past year mirrorless cameras like the Fuji X-T1 have progressed to a point where they are quick, accurate, and are now supported by superb optical systems. On top of this it produces highly competitive image quality from a smaller sensor that makes the whole system smaller, lighter, and more convenient to use on location. For these reasons I find myself slipping my X-T1 into lifestyle shoots that were previously the exclusive domain of my Nikons.

With the introduction of the Nikon D750, I have also begun using it as my main lifestyle camera instead of a D4. Having 24mp to work with helps, as does the tilt-screen, wifi control,  and smaller, more portable size, as does the faster, 6.5fps frame rate -- plenty fast enough for most lifestyle situations. Ever since the D750 came out I have been using it and a Fuji X-T1 for all my lifestyle shoots, choosing one over the other based an handling differences. Bottom line is that I no longer have any qualms at all about relying on my X-T1 for shooting lifestyle, or anything else for that matter. This decision  has been spurred along by the continuous support Fujifilm has provided in the way introducing new lenses that are every bit as good as any top flight, full frame, pro optical system -- maybe even better than most. The recent introduction of a f/2.8 16-55mm zoom to complement the already well-received f/2.8 50-140mm rounds out the system to professional requirements.  All that is missing now are some extremely long focal lengths, and they are already in the works.

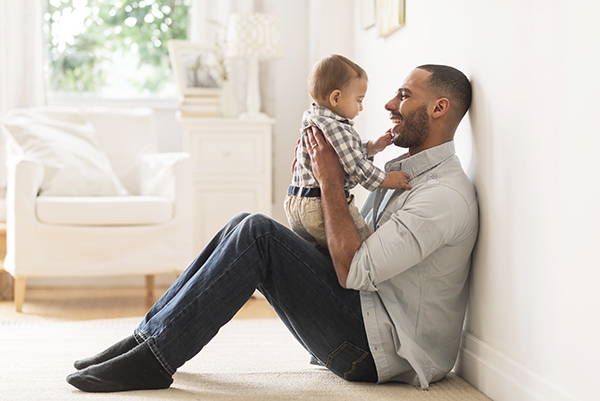
The samples in this post were taken over the course of a week during two lifestyle shoots in out studio using both the Nikon D750 and Fuji X-T1 cameras. This image was taken with the X-T1, but just as easily could have been taken with the D750. The results would have been close enough to equal to negligible. 

Response time is critical in lifestyle shooting. The photographer must be ever ready to jump on a spontaneous moment when it occurs, and the camera has to be capable of fast reaction and continuous follow through if necessary. As good as the mirrorless cameras, like the X-T1, have become, I would still give the edge for this feature to a fast DSLR. The refresh rate of the viewing screen in any mirrorless camera, no matter how good, is still an artificial way of looking at a scene. Once the motor drive keeps going as the action progresses, I find it much easier to follow it with a DSLR.

That said, there is a something an X-T1 finder can deliver that is very helpful. Because you are viewing a digital interpretation of the scene instead of the real scene you also get to see the actual digital effects of your exposure without moving your eye from the finder to look at a preview. In a sense, the image you are currently viewing and taking is actually the preview. When the light is changing rapidly or the subject is moving in and out of light and shadow areas, I can easily adjust the X-T1 to compensate as I proceed with capturing the scene. With a DSLR I have to take my eye away from the finder and look at a preview of the last image to check and then adjust the exposure.

At close or even moderately close distances using the 85mm f/1.2 lens on the D750 with the aperture set anywhere between f/1.2 and f/1.6 is dangerous in terms of achieving sufficient focus on the subject.  The depth of field is so shallow at that aperture that you might wind up with the eyelashes in focus and the eye itself out of focus -- not a very flattering result.  For this reason, I try to limit myself to a maximum opening of f/2 on a full frame camera. On the X-T1, on the other hand, I don't have the same problem. Even wide open with the equivalent lens, which would be the 50mm f/1.2, I achieve a much higher percentage of pleasing in-focus images while still maintaining the selective focus effects I like.

In this shot taken with the X-T1 and 56mm lens set to f/1.2 the plane of focus is sharp and sufficiently deep even at this close-up range. Shots like this are much more difficult to get looking right with the equivalent lens and aperture on a full frame DSLR. I would expect to have to stop down to f/2 or f/2.2 to achieve the same results. This was not a static scene with the model locked in one position. I had her moving her head back and forth from the computer screen to the cell phone and then point at the screen. She kept repeating this action. I set up mini-scripts like this to coax nuances of action from the models gestures to add some life in otherwise static situations. With a lens set to f/1.2, in as close as I am in this scene, the camera/lens combo has to be very good to keep the eye of the model in constant focus as she moves about. The X-T1 can do this -- but so can any top Nikon camera. 


We put a scrim over the window to eliminate all the detail from the outside scene. In this way, the scrim and bright daylight is producing a similar light to a studio soft box.  This window light provided all the illumination for this scene. There was no fill to bounce light back into the shadows.  The dynamic range of modern digital pro cameras is good enough to hand such a harsh scene without blowing out the  highlights or losing detail in the shadows. The X-T1 with 56mm lens was used for this shot. 

When composing through the viewing screen of the D750 I find myself often having to take advantage of the larger 24mp sensor by pulling back far enough so I can place a focus point on an important area near the edge of the image. With the Fuji's smaller APS-sized sensor I try to avoid cropping because I don't want to sacrifice any more quality that I have to. Fortunately, the focus points on the X-T1 pretty much cover the entire screen so I can always reach into a far corner to focus. This allows me to always use the full X-T1 sensor and not have to give up precious pixels by cropping the image. 

I am always looking for an unusual angle on a scene so here I am under an office desk with the camera resting right on the floor thanks to the X-T1 tilt-screen. The camera is focused on the face of the model in the back. One reason I like working with the Fuji X cameras is that the focus points extend to the very edges of the viewing area. In this case I had no trouble putting a focus point right on the model's face. A D750 viewfinder could not do this at all, and moving the focus point around on its tilt-screen is not as easy as on the X-T1. 


Shot in a gym with the Fuji X-T1, 56mm lens at f/1.6 and ISO 800 using available light from overhead fluorescent fixtures plus some added front fill into the model's face from a white reflector. I wanted the camera sitting right on the floor. The tilt screen on the X-T1 always made it my first choice for this severe angle. Now the D750 also has a tilt screen. So that is one advantage the X-T1 no longer has. 

One of the interesting observations that has become apparent when shooting the Fuji X-T1 side-by-side with a Nikon DSLR is that the exposure needed to achieve the same results has been differing by around 2/3 of a stop -- sometimes a bit more, sometimes a bit less. In other words, while I am able to capture a correct exposure on the Nikon at, say, 1/500 second, I may need 1/320 second on the Fuji for the exposures to be equal. Since most of the time I am working at what I consider the lowest limits of a hand held camera in terms of aperture and shutter speed, I often have to make the compensation using the ISO. This is not very desirable especially considering that the Fuji is already handicapped with a smaller APS sensor size that is going to make it more susceptible to noise than the full frame Nikon.

This back lit scene was taken with the Nikon D750 and 85mm lens set to f/2. The ISO was 400 and shutter speed 1/640 second. I used the Fuji X-T1 on the same scene, but it needed a shutter speed of 1/400 second to achieve the same results. That is a 2/3 stop difference. 

I have been in this profession long enough to remember when shooting like this would have been impossible, even with the best Nikon F film cameras available. The digital revolution of the past decade has dramatically expanded the range in which a camera can see and operate. Now the mirrorless revolution is taking this another step by shrinking the size of the equipment to a smaller, more comfortable level. 

I depend upon photography, and by extension photography equipment, for my livelihood. I also shoot a very broad category of subjects from lifestyle, to still life, landscape, travel, and food, to name some of them. For this reason I have always tried to stay on top of the changes in equipment -- a task that has become all the more daunting as the digital race continues.

Using the word, "shootout" in the title of this blog might be a misnomer. I am really no longer comparing the two systems. The Fuji X-cameras have proven themselves to me with their results. It had become more a matter of "both/and" as opposed to "either/or". The Fuji X-series no longer has to prove itself to gain admittance. It is already there. 

I am constantly introducing new technology into my workflow to see if it will improve the results and make my job easier. I began using the Fuji X- cameras with the first X-Pro1 when I realized I was witnessing a significant advance in digital photography. Over the past few months I have integrated the X-T1 into our regular photography workflow as an option on par with the other equipment I use. In my mind the testing phase is over. Now I reach for the X-T1 as I would for the D750 or any other high end camera, for what it can do best given the task at hand. Basically, this is a "right tool for the right job" philosophy. Works for me.