Friday, May 31, 2013

Manhattanhenge

Twice a year, approximately  three weeks both before and after the summer solstice, the sunset lines up with the street grid of Manhattan.  The term for this, Manhattanhenge, was coined in 2002 by astrophysicist, Neil deGrasse Tyson of the American Museum of Natural History as a reference to Stonehenge in England.  It only applies to those streets beginning with 14th and going to upper Manhattan that were laid out in 1811.

The photo below showing the Empire State Building with the setting sun was taken at the intersection of 34th Street and Park Avenue using a Fuji X-Pro1 and Touit 12mm f/2.8 lens I am testing for a blog review coming soon.

Taken with a Fuji X-Pro1 and Touit 12mm lens at ISO 400, aperture of f/5.6, and 1/250 second exposure.

Taken with a Fuji X-Pro1 and 18-55mm zoom set to 30mm.

How to Photograph Manhattanhenge:

Although the exact date for Manhattanhenge in 2013 are May 28th and July 13th when the sun is a full ball centered on the street as it sets on the horizon, it is possible to obtain great photos for at least five days before and after the main event.  

Be sure to allow plenty of time in advance of actual sunset.  You will have approximately ten minutes from when the sun peaks around the corner of the southern building until it finally sets.  So get to your shooting site at least a half hour before the time listed for actual sunset.

Photographing the sunset event is not too difficult, if you don't count taking your life in your hands to dodge street traffic.  The three things you will have to deal with are:  finding the right location, selecting the proper lens for what you want to capture, and setting the proper exposure when shooting directly into the sun.

Location:

While any cross street on the grid above 14th Street will provide the proper vista, a good choice is usually one of the wider streets, such as 14th, 23rd, 34th, 42nd, etc.  Two streets that make particularly good vistas are 34th and 42nd Street.  That is because they contain two important New York buildings that look distinctive in silhouette.  The Empire State Building is on 34th Street at Fifth Avenue.  The best place to record its silhouette and the sunset is from the East side of Park Avenue.    

A similarly dramatic view can be had of the Chrysler Building, which is located on 42nd Street at Lexington Avenue.  The best place to include it in your photograph is from an overhang that crosses 42nd Street near First Avenue.  Unfortunately, this is one of the most popular views and is very crowded with people, some of whom show up in the early afternoon to reserve a spot.  Another view of 42nd Street including the Chrysler Building is from street level where 42nd crosses Second Avenue.

The shooting spot happens to be right in the middle of the Street.  People wait for the "walk" signal and then quickly take a few photos before scurrying back to the safety of the sidewalk when the light changes to give the traffic the right of way.  Large groups also gather on the 42nd Street overhand that goes up Park Avenue to Grand Central Terminal.  The problem with this view is that the Chrysler Building is not in the shot so you have to be content with a simpler shot.

Whatever location you choose, it is best to scout it out ahead of time.  The Sunset event happens quickly in less than ten minutes.  When you couple that with all the traffic and crowds, you really do not have much time to prepare on the spot.  

Lens choice:

There are basically two types of shots to this event: One is a wide view that includes some of the story-telling detail of the city.  The other is a tight, telephoto shot of the ball of the sun, perhaps combined with some to the city traffic to add interest.
In this case a moderate wide angle focal length of 35mm includes a full view of the city with the Chrysler Building on the right framing the setting sun.

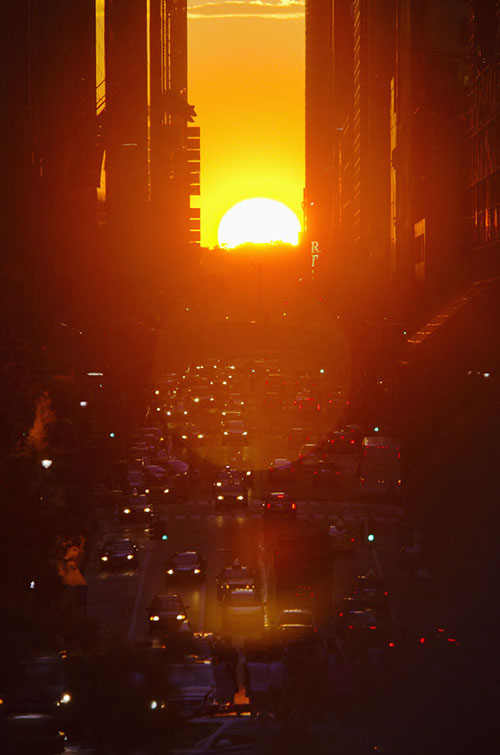
Here a long telephoto lens of 400mm compress the space.  This enhances the congestion of traffic and provides a solid circular shape to the sun.  The refracted blurs over the traffic were caused by shooting directly into such a powerful light.
For a vertical wide angle view you will need the equivalent of a 24-50mm lens.  (All focal lengths here are expressed for full-frame format cameras.  On a camera with an APS format divide the focal length numbers by 1.5.  For instance a 24-50mm in APS size would be approximately 16-33mm).  To obtain a horizontal shot like the first one on this blog entry you will need a lens between 16-28mm.

To capture the ball of the sun takes something between 200-600mm, with 300-400 providing a good combination of full sun and some compressed areas of the city traffic and buildings.

Exposure:

Shooting directly into the sun, especially with a telephoto lens will usually fool the camera light meter into under-exposing the image, resulting in a very dark silhouette with no detail.  It is best to put your camera on manual exposure mode and take a light reading.  Do not read the light with the camera pointed directly into the sun.  This will result in an under-exposed image.  Instead, point your camera to an area of the sky where the sun is just a tiny bit out of the frame, and take a light reading of this area.  Use that as the basis of your starting exposure.  To play it safe, bracket your exposure by shooting one full stop lighter and one darker than the correct exposure.

You probably do not need a tripod because you will be shooting directly into the sun.  This will provide an exposure with plenty of motion-stopping shutter speed.  An ISO setting of 200-400 should work fine for this, and should be sufficient to allow a fast enough shutter speed to hand-hold the camera at a lens opening of f/4-5.6.  

In a situation like Manhattanhenge where you include a very bright light object and dark areas of shadow, it is best to take the photograph in RAW format.  This will give you a wider color and exposure latitude to make corrections and adjustments afterward.  All of the photos used above were done in RAW and enhanced later in Photoshop to bring out the color and details where desired.  


Thursday, May 30, 2013

Central Park - Take 2

Yesterday morning was overcast and misty, exactly the type of weather I am looking for in my new project to photograph nature in New York's Central Park. So off to the park I went with Nikon D800 and an assortment of lenses.  This time I covered the area around The Pond at the lower end of the park.

My first surprise was when this heron decided to take off and pass right in front of me. Fortunately, I had the 70-200mm f/4 zoom on the camera and was able to snap off several spontaneous frames. I was lucky enough to grab a couple of nice frames of the bird in flight. This is where I wish I had the D4 with its super fast  motor drive.

The main reason I choose overcast and misty conditions for shooting is to obtain soft backgrounds and white skies in shots like this.

I have been converting some of the images to a platinum monochrome tone such as this. These I am planning to use in a limited edition book.

I found this little waterfall at the remote end of the pond, and was able to slow the exposure down to 2 seconds by using a polarizing filter and f/22. The slow speed gave me the flowing water effect and the polarizer helped to saturate the greens by removing specular reflections.

If you read my previous post, you'll know that I started carrying a Tamron 90mm macro lens with me to have a longer focal length when doing close-ups. I love the bokeh background in this shot achieved with an aperture of f/5.

One reason I like photographing on overcast days just after a rain is for shots like this of water drops on a leaf.

Craggy trees and large stone outcrops are part of the natural terrain of the park. As I was taking this photo, the sun began to break through the clouds and I called it quits for the day.
 
Late May and early June is my favorite time for shooting woodland scenes. The leaves are full and a lush green and flowing water is usually at its peak.


Tuesday, May 28, 2013

Tamron 90mm f/2.8 SP AF Di Macro lens
a hands on review


After my last trip to Walden Pond, I began looking for a macro lens that was longer than the Nikon 60mm I had been using, yet still small and light enough to be tucked easily into my already too-full gadget bag. I have a Nikon 105mm macro which is a superb lens, but it was larger than I cared to lug around on the trips. Sigma makes a 70mm, but that was too close to the 60mm I already had to make a practical difference.  I wanted something in the 90mm range, and found it in the Tamron 90mm Macro.

Tamron has two 90mm macro lenses -- a new one with vibration reduction and a fixed length when focusing, and an older model whose barrel extends when focused close. This is the one I settled on.  It weighs only 14.29oz (405g) and is a short 3.8" (9.65cm) at infinity focus.  This is only a tad larger than the Nikon 60mm I had been carrying with me.  Perfect -- if it could perform.

The Tamron 90mm f.2.8 SP AF DI Macro lens set to infinity focus.


When focused as close as it can go, which is to say 1:1, then lens barrel extends out to 5.75" (14.6cm).

Most macro lenses are built to perform with little or no distortion and the Tamron 90mm follows suit. It was sharp overall with a flat field, auto-focused quickly, and produced no noticeable vignetting. 

Unlike its newer brother, this version extends the barrel as it focuses closer. At full extension its maximum aperture also drops from f/2.8 to f/5.6.  A drop in aperture is normal for macro lenses as a result of the added extension. Lenses that do not extend are generally preferable, but for me the packing size was the most important consideration. The lack of VR also contributed to keeping the weight and heft of the lens body low.

This lens has an unusual feature for switching itself from manual to auto focus. Instead of a switch on the barrel, the entire focusing ring moves in and out to change modes. I was hesitant about this feature at first, thinking that it might be an easy way to move the lens from one focus mode to the other accidentally.  After using it for a very short time, however, I found it to be far more convenient that the standard switch method found on most macros. For one thing, macro lenses often hunt excessively for focus due to their long focus range. The push-pull collar on the Tamron was a quick way to manually override and correct the focus and then switch it back again to auto once it was within range.

The lens is set to manual focus mode on the left with the focusing collar pulled back. A blue line around the front of the lens quickly identifies the mode.  On the right the lens is switched into autofocus mode with the focus collar pushed out. The blue line also disappears.
The lens comes with an accessory lens shade, but I found it to be unnecessary to put it on because the front element of the lens is so recessed it provided all the shading and protection I needed.

This series of lens is what Tamron terms DI. This stands for Digitally Integrated, and refers to the extra multi-coating of lens elements to make them perform better with digital sensors. It also has an internal motor for autofocus so it can work with camera bodies that do not have their own built-in focusing mechanisms.
 
Focus was quick and accurate for a series of bee photos I did. The bees were darting around quickly, and I also chose to work with the aperture fairly wide open so I could obtain a shallow depth of field. This made my dependance on the quick and accurate focusing ability of the lens all the more critical.
This 1:1 shot was taken at full extension of the lens and aperture at f/5.6, which means wide open when this close.
Lens bokeh is very pleasant as can be seen in the roundness in the background blurs. One of the reasons I wanted a longer focal length macro was to obtain shots like this with a softer background.
Another benefit of having a 90mm macro is that it is also a perfect focal length for portraits, providing a very pleasing perspective in a head and shoulders shot.

This portrait was directly back lit with soft light from a window, and with the lens aperture wide open. Even in such difficult light, the Tamron provided good contrast and was able to autofocus quickly and accurately.
This side by side illustration shows the long throw of the focusing barrel as the lens moves from infinity on the left to its closest 1:1 range on the right.

Conclusion:

In terms of performance the Tamron 90mm SP DI Macro is a champ, performing equally well at all ranges from infinity down to 1:1. It is an ideal focal length for portraits and for close up focusing where shallow depth of field and greater lens distance is desired.

The build quality of the lens is light plastic so it does not have the toughness associated with most pro lenses.  Nonetheless, this does keep the weight down, and for me that was a prime requisite. The long throw of the lens barrel is usually not desirable either, but serves the same purpose.  In addition it also helps keep the cost down to around to a $500 range.

 The VR version of the 90mm macro might be a better choice for serious work, but it is also more expensive, and heavier. For my purposes, the lens tested here does the job in a nice compact body.


If you are planning on purchasing this lens, you can help support this site at no extra cost to you by purchasing from one of our affiliate sellers listed below -- and thanks for your support.


Tamron 90mm f/2.8 SP AF Di Macro Lens for Nikon can be ordered from:  BH-Photo Amazon   

Monday, May 27, 2013

Lightning in a night sky

I was in Jamaica for the past few days where I photographed the sunset every night. Each day, late in the afternoon, thunderclouds would roll in, drop some rain, and then clear out. This is often a good opportunity for some interesting cloud formations to enhance a sunset. The moon was full, as you can see from my previous blog post, and very bright -- so much so that it lit the clouds in the night sky.

This photo was taken in the dark just after sunset. The moon provided sufficient illumination to highlight the clouds and add detail to the scene. An occasional lightning bolt would burst from the distant thundercloud. With the ISO set to 250, I opened the shutter for 13 second exposures, taking one after another, until I captured one of the lightening flashes coming from the cloud.

The shot below is too small to do justice to the scene so I provided a link to download the full res image. Some of the stars were bright enough to record in the darker part of the sky, but at 13 seconds there is a slight motion blur to them as they moved along their course.

I took the photo with a Nikon D800, my first choice for landscape photography, and a 28mm focal length set on a  24-120mm Nikon zoom. Download a full res version of this image by clicking here.

Saturday, May 25, 2013

Shoot the moon

Normally when you photograph the moon at night and try to include the ambient clouds you need to do it in two exposures because the moon is so much brighter than most of us realize that it overexposes itself into a white circle. I took two exposures when shooting the image below but wound up only using the exposure for the clouds.  The reason is that the clouds passing over the moon added detail to the blank white circle of the moon so that I didn't need to burn in the moon detail by using a second exposure for just the moon.

There was a beautiful moon last night made eerie by the passing clouds. The longest lens I had with me is the Nikon 70-200mm zoom plus a 1.4x converter. After switching the Nikon D800 into its 1.2x crop mode I was able to gain enough of a long focal length to pull off this shot. At the time I also did not have a tripod with me so I resorted to boosting the ISO to 1600 and hand held the camera for an exposure of f/5.6 and 1/100 second.
After I returned home I was able to post-process the image the way I originally intended it to be, as a combination of two exposures, one for the sky and one for detail in the moon. There is a 5-stop difference between the photo of just the moon and the photo that recorded the clouds.


Friday, May 24, 2013

Central Park in monochrome

I just received the black and white negatives I did with a Hasselblad in Central Park on the rainy day last Sunday, but didn't really care for the way they looked.  I was experimenting with a new film.  Fortunately, I took the precaution of duplicating every scene with my Nikon D800 so I could use that for the black and white images if the film images didn't work out.  Good thing I did.

I ended up using a platinum tone on the prints. Here are a few of them.


Thursday, May 23, 2013

Legends: Argus C3 Camera

The Argus C3 is a 35mm camera first manufactured in 1939 with production lasting into the 1960's. Because of its boxy shape and durability it was often referred to affectionately as "the Brick".  It had a manually focusing 50mm f/3.5 Cintar lens, a top shutter speed of 1/300 second, and a coupled rangefinder. It has a cool, art deco, retro design, and came in different colors.  Working models can be found inexpensively on eBay.

This is my personal model. It is in pristine shape and still works perfectly. I keep it at my studio where we haul it out occasionally to  use as a prop that gives our photos a retro look.

Wednesday, May 22, 2013

Tuesday, May 21, 2013

Central Park in the rain

It rained on Sunday and I began a new project photographing nature in New York's Central Park for both a limited edition book and print portfolio. At this time of year the vegetation is lush and full with the light rain saturating the colors. I plan to photograph primarily on overcast days to eliminate the harsh contrast of the sun. I photographed digitally with the Nikon D800, and on black and white film with a Hasselblad 500cm. Below are some of the Nikon photos I took.

I began at Betheda Fountain and did a circuit around part of The Lake and into the natural woodland area of  the Ramble. One side benefit of photographing in the rain is that it kept the crowds away, even on a Sunday.
For the most part I photographed with only one lens, the Nikon 24-120mm zoom because I did not want to be changing lenses too often in the rain. The only other lens I had with me was a Tamron 90mm macro, which I used to take this image of rain drops on pine needles.
I wanted an extreme depth of field for most of the shots so I worked primarily around f/22 using a tripod, of course.
Rain drops falling on the lake.
My Nikon D800 was covered in water by the end of the day.
The falling rain added a soft, Impressionist mist to this panorama with the Bow Bridge.

Monday, May 20, 2013

Self-Publishing a Photography Art Book

This past weekend I attended another event at the Center for Alternative Photography. This all day course was about self-publishing an artist book. The class was taught by Lauren Henkin, a dedicated art photographer and publisher whose work is widely collected. Her presentation was extremely thorough with plenty of samples, and a very complete handout listing everything you need to know to get started on your own.

I don't know when this lecture will be repeated, but I can highly recommend it to anyone who is interested in learning how to self-publish a photography book.

Lauren brought plenty of samples for the class to peruse.
Details:

Center for Alternative Photography
36 East 30th Street
New York, NY 10016
917-288-0343  
 
Lauren Henkin's website: http://www.laurenhenkin.com/
Lauren's book imprint: http://www.velanoche.com/