Tuesday, October 30, 2012

Here in New York the city is all but shut down as we wait the arrival of hurricane Sandy.  All public transportation is stopped and the bridges and tunnels are closed.  There isn't much to do but stay home and photograph raindrops on the windows.


This was taken up close with a 60mm macro on a Nikon D600.  I used the lens wide open to throw the background buildings completely out of focus.

As darkness approached the city lights began to come on giving a nice contrast in color between the warm glow of the city lights and the blue cast of the storm.


I had a little experimental fun with this one.  I attached a 60mm Leica R macro lens to the Fuji X-Pro1 using an adapter I found on Ebay.

For this dusk shot I stopped the lens down a bit to help define the background silhouette.

Monday, October 29, 2012

For years I have been riding by bike through Manhattan early on the weekend mornings.  Many years ago I did this on a ten-speed Peugeot racer and carried a Leica M2 with me.  The Peugeot is long gone, and the M2 now sits on a shelf in my office as a nostalgic reminder of all those early trips through the city.  On one of those long ago trips I took the photo below of an ornate section of the old West Side Highway just before it was torn down.


This morning while once again riding a bike along the Hudson River, I happened upon a graveyard for some of the artifacts of the old highway and took these pictures:

The same ornament from the old West Side highway image above now sits an empty lot on the edge of the Hudson River, which is where I took this photo on my bike ride this morning.
Rusted girders from the former highway also rest in the lot, as wild flowers grow around them.

This is the original Leica M2 I used to take the topmost black and white photo of the West Side Highway.  The camera is shown here with an accessory Leica meter and a dual-range 50mm Summicron lens.  I still use this camera occasionally for shooting with black and white film.


Sunday, October 28, 2012


The camera outfit a well dressed photographer wore in the early 1930's
 
Leica Standard 1932-33
 
The Leica camera was introduced in 1925, but a truly practical consumer model did not appear until the Leica Standard of 1932.  The Standard introduced interchangeable lenses, used 35mm cine film that you could roll yourself onto self contained film canisters, and had shutter speeds from 1/20 - 1/500 sec.  Most photography was done in black and white. The first 35mm Kodachrome slide film would not appear until 1936 with a speed rating of ASA10 (now referred to as ISO10).

The 1932 Leica Standard was the first really practical 35mm camera model with interchangeable lenses.  It is shown here with a leather case that could hold the camera, its 50mm f/3.5 collapsible Leitz Elmar lens, accessory rangefinder, and a holder for two rolls of 35mm film.


The camera had a viewfinder but no internal focusing device.  Instead, you could mount an accessory rangefinder on top to measure distance.  Once this has been determined the lens was focusing ring was turned to match the distance scale on the rangefinder.

You would determine distance by looking through the top window and turning the dial until two split-images coincided.  You looked through the lower window to frame the picture. 

The Leica was originally made to accept 35mm film from the cine industry.  You would load the film into canisters, like the one shown above, put it into the base of the camera after removing the base plate, and thread the film leader across to a spool on the other side.

Friday, October 26, 2012

This stock image was photographed under available light on a Nikon D800 and 85mm tilt-shift lens.

The same scene was shot as a stock video on a Nikon D4:


Thursday, October 25, 2012

I found this leaf on a sidewalk and photographed it for a book I am doing on found hearts.  This is a case where I happened to have the Sony RX100 handy in my pocket, and so I was able to grab this shot.  I enhanced the color later in Photoshop after moving the image into LAB color profile.

Wednesday, October 24, 2012


Today in the studio we photographed a series of seasonal stills representing October and Halloween.


...and we were shooting video at the same time:


Tuesday, October 23, 2012

There was a dense fog in the harbor of lower Manhattan when this ferry boat was coming into the dock. Fortunately I had the Sony RX100 with me and was able to access it quickly enough to capture this one image.  I particularly like the very muted color palette.  It almost appears to be monochrome except for the very subtle yellow light on the lamp post.

Monday, October 22, 2012

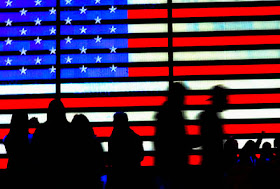
I took this photo in Times Square today.  I wanted the people to blur and silhouette against the lit up flag so I used a shutter speed of 1/10 second on a Nikon D600 with a 24-120mm zoom.

Sunday, October 21, 2012

A fog was lifting early this morning in lower Manhattan.  The clouds swirled around the new World Trade Center as they were lit by the rising sun.  I was riding my bicycle in the area and picked up several variations of the scene with the Sony RX100 camera.  To increase the resolution detail of the smaller sensor in this camera I captured some of the scenes with several panned images and combined them in post-processing as one larger composite.

This panorama is made up of two horizontal photos combined later in Photoshop.  This technique resulted in a final image that was approximately 100MB in size.  When this larger image is down-sized to a 50MB file for stock photography the overall resolution has a much greater sharpness than if I had taken one photo and cropped it to this format.

This photo of the Winter Garden Atrium and new World Trade Center rising from the fog behind it shows the extent of dynamic range with the Sony RX100 by capturing full detail in the dark area of the foreground building to the bright highlights in the morning fog with sun light streaming through it.

This vertical image is made up of a composite of four horizontal photos combined in Photoshop. The resulting resolution is much higher than a single image of the scene.

Friday, October 19, 2012

These shots were created in my daylight studio using two different techniques to cause a blur.  In one the man is blurred; in the other the background is blurred.  My daylight studio is very bright so I used a variable neutral density filter to dial the darkness of the scene to a point where I could use a shutter speed of 1/20 second to give me just the right amount of blurring.

With the camera on a tripod I selected a shutter speed of 1/20 second and had the man move forward at a brisk pace.  The non-moving camera caused the background to be sharp, while the slow shutter speed blurred the man.

This is the opposite treatment.  Here I set up a flash (a Nikon SB-900) in front of the man.  Daylight was lighting the scene primarily from windows on the left.  The camera was on a tripod but I panned it to the right as the man moved.  This caused the scene to blur and the left side of the man to blur also because they were only receiving daylight illumination and a slow shutter speed of 1/20 second.  The right side of the man is sharp because it was frozen by the flash.  Both shots taken with a Nikon D4 and 70-200mm zoom.

Wednesday, October 17, 2012

I found this little restored AMC Metropolitan circa 1960 parked in the garage where I keep my car and snapped a couple shots with the Sony RX100.  The softening technique was added later by running the images a few times through Alien Skin's Exposure 4 software.


This is what the two photos looked like before applying technique to them in Photoshop. First he background was considerably softened with a selective blur. Next the images were passed through Exposure 4 to alter the color and contrast so they would have more of a nostalgic feeling.  The white edge treatment further subdued the distracting background.

Tuesday, October 16, 2012

One of my favorite stylistic devices is shooting directly into the sun to enhance a scene by providing a specific point of focus.  These two scenes were a bit too flat and uninteresting in themselves so adding the sun perked them up.  This technique also allows the images to be used by designers more as backgrounds in a design project -- something I always consider when shooting commercial stock.

This was early autumn and the all the leaves had not yet turned color.  I felt the scenes needed a bit more punch.  In post-processing I enhanced the colors and gave them more of an overall monochromatic tint.

Here I allowed the sun to completely flare the scene.  This also reduced detail considerably.  As a result, the image was blurred, especially on the left.  The blur area is a good place for an art director to lay some copy later on -- an important consideration when shooting for commercial stock photography.

In this situation I placed the sun so it was just peeking out a little bit from behind the two branches of a tree.  This muted the flaring effect of the light and added a star shape to the sun.

Monday, October 15, 2012

Using a polarizing filter to control glare

The most common uses for a polarizing filter are to darken a blue sky and eliminate reflections.  There is another application that may be even more useful to enhance your subject by eliminating glare.

The photo below was taken on a sunny autumn day shooting against the light such that the sun caused severe glare in the pumpkins.  The glare was so intense that it washed out  detail and color from the highlighted areas.  A polarizing filer mounted on the lens eliminated the glare and brought back the intensity of the color, something very important in a subject such as this.

Strong back light from the sun caused the highlights to lose all detail and color.

A polarizing filter was added to the lens and turned until the glare disappeared and color was restored to the blown out areas.

The same thing is happening to the blown out highlights of this corn.
Applying a polarizing filter eliminated the highlights and restored the color.
Here is a technique for dealing with glare when you do not have a polarizing filter handy.  For this shot I chose a wide open aperture to add a strong out of focus effect by blurring the highlights.  Later in post-processing the image I added a yellow warmth to the scene that gave it more of a sunset look.  Frankly, I prefer this interpretation better than the polarized version.

Saturday, October 13, 2012

Sony Cyber-Shot DSC-RX100 hands-on review

These reviews are meant to give a personal, hands-on experience by a professional photographer, and do not go into all the equipment specifications readily available elsewhere on the internet.

Don't let its small size fool you.  The Sony DSC-RX100 is capable of delivering pro-quality RAW images from an unassuming, small, point-and-shoot package.
One of the holy grails of pro photographers has been a carry-around digital camera that is pocketable yet sophisticated enough to achieve pro quality image results.  If that sounds like something you have been looking for, you may now be in luck.  Sony's new Cyber Shot DSC-RX100 camera is similar in size to many point-and-shoot cameras, but comes with a large 1" sensor (same size as the sensor in Nikon's new CX series cameras), Carl Zeiss 28-100mm equivalent zoom lens, and is capable of supplying RAW image files. The other camera that comes to mind in this category is the Canon G1X.  Although it has an even larger sensor,  the G1X is also much larger and unnecessarily complex -- not something you are going to easily stuff into a shirt pocket.

Sensor size is the most defining contributor to digital image quality. The standard sensor put into most point-and-shoot cameras is 1/1.7".  The 20.2MP  RX100 1" sensor area is 2.76 times larger even though the camera itself is almost the same size as a point-and-shoot camera like the Canon S100.  The base format of the RX100 is a 3:2 proportion, which is the same as 35mm full-frame cameras, but 4:3, 16:9, and my personal favorite, 1:1, are also available.  I found myself setting the camera to shoot both RAW and jpg at the same time, and usually set the jpg image to be captured in the black and white creative style and 1:1 square crop.  This way I have the jpg if I want it, while the RAW image remains in full 16-bit color with a full 3:2 size if I want to take advantage of it later.

Using the technique described above, this is what I see as I photograph using the black and white creative style and 1:1 square format, while I still capture the full RAW data in the image below in case I want to modify the image later.


While it might have a look of point-and-shoot simplicity, the RX100 is equipped with plenty of conveniently placed pro options. A dial on top of the camera selects the shooting mode, which include the familiar M (manual), A (aperture priority), S (shutter priority), and P (full program) in addition to a simpler iAuto mode. The four focus modes include AFC (continuous), AFS (single-shot), MF (manual), and DMF (auto-focus with allowance for manual correction).


The lens is a Carl Zeiss f/1.8-4.9 zoom with a 10.4-37.1mm ( a 2.7 image multiplier factor gives a 28-100mm equivalent) optical range.  The f/1.8 aperture is nice for low light but quickly fades to f/4.9 at the longer focal length. Furthermore, even at f/1.8 the 10.4mm short focal length does not yield much in the way of selective focus.

The menus are convenient and intuitive to use.  The moveable ring around the lens can be programmed to sever different functions that are easily called up by the fn (function) botton on the rear of the camera.  Frankly, this is one of the easiest cameras I have ever used and made all the more so by incorporating features that are most expected by professional photographers.

Having the RX100 handy and quick to use allowed me to grab this stock photo from a moving taxi on a highway coming back from the airport.  I had just enough time to roll down the window, point the camera, and click off a few frames.
Normally, high mega pixels on a smaller sensor translates into excess noise at high ISO's.  This camera has an ISO range of 100-6400.  Frankly, I never use the highest rated ISO in any camera, even in the newest Nikon's which have the best high ISO of any camera out there.  To achieve usable results for a stock image with a 1" sensor I try to keep the ISO as low as I can.  That said, I did test the sensor at high levels and found that under some circumstances the RX100 could be pushed comfortably to ISO 1600 by applying post-processing noise reduction.

The built-in, pop-up flash can be manually tilted.

Another feature that will appeal to pros is how the built-in flash can be tilted with your finger to adjust the angle of the light to either bounce it off the ceiling or simply lift some of the light off of the foreground.  Tilting it back just a bit takes enough light off the foreground to provide a more natural, even transition from front to back.  Such a feature comes in handy when, for instance, you subject is sitting across a table from you an you want to add some fill light without burning the foreground with excess light.

This image was stitched together from two RAW photos to make a higher resolution panorama.
While the camera does have its own panorama mode by stitching together images taken as the camera moves from side to side, I always prefer to create my own panoramas later in Photoshop.  This achieves a much higher resolution image for several reasons. The built-in panorama is made up of jpgs, whereas my Photoshop assembled image can be made from RAW files.  Plus the Photoshop assembled image adds together the resolution of the larger RAW files resulting in final photo that is much sharper with finer detail.

The rear of the camera has a no-nonsense, easy to use layout, and large 3" LCD display.  Pressing the Fn function button allows you to conveniently and quickly rotate through a series of seven commonly used menu choices that you can set yourself.  I have it set to exposure compensation, ISO, auto-focus modes, crop format, and drive modes -- the features I change the most frequently.  Once you are accustomed to it, this feature is very convenient.
The camera sells for $648 (€500, or £400), which is expensive, and primarily due to the extra cost of the large sensor. The primarily cost in digital cameras is for sensor real estate, and this camera has a lot of it.  I like to think that the cost is covered by the extra shots I will probably pick up by having this camera with me to grab spontaneous shots that I would otherwise miss.  The photo of the blank bill board sign above is a case in point.

A shot like this pushes the limits of a this camera. It was taken in very low light at an ISO of 2500 with considerable technique to mimic an Instagram look added later in Photoshop.
The close-up photo of the car meter above is exactly the type of spontaneous photo I expect to pick up by having a camera like this handy at all times. The shooting circumstances required a very high 2500 ISO.  I applied a necessary noise reduction to the RAW image in Bridge before bringing it into Photoshop.  Even so, it required more noise reduction before the image was acceptable as a 50mb file.  As the adage goes, the best camera to use is the one you have with you.  In many situations like this, this may be the only camera I have on hand.  Yes, I could have relied on the camera in my mobile phone, but the results would not be anywhere near as good as can be obtained from a camera such as the Sony DSC-RX100.


By starting with a high 20.2MP resolution images retain detail even when cropped to a square format.


Bottom line is: This camera is an overall winner.  It isn't going to replace your full frame DSLR, but it will serve you well in a pinch when you just have to get the shot.  And, yes, it does shoot HD1080 video.

Monday, October 1, 2012

These images of the New York skyline were done with a pan-blur.  The camera was moved vertically during the 1/6 second exposure.  I experimented with different shutter speeds to achieve just enough blur so the city profile would still remain recognizable.


Both photos were taken with a Nikon D4 camera, 200mm focal length, and ISO of 800.